|
|
Page modifiée à 02:17, 13 Mai 2013 par MichelBuffa
HTML5 tutorial for WWW 2013: study two chat programsDe $1IntroductionIn this tutorial we will learn how to use HTML5 WebSockets. We need a server that supports this protocol. We will use the NodeJS server, very popular with HTML5 games. It's a small, powerful server, that embeds the V8 JavaScript interpreter (the one in Chrome), enablind server side JavaScript. We will look at two versions of a small chat application, that use the socket.io and express modules for NodeJS. Notice that socket.io has also implementations server side for Java, C#, Android, etc). Installde NodeJS and the express and socket.io modulesGo to http://www.nodejs.org and install the last version of NodeJS. Click on the install button on the web page. Check the installation. Open a terminal window, type "node --version", this should print something like: "node 0.10.x". Test of a first NodeJS application
var http = require('http');
http.createServer(function (req, res) {
  res.writeHead(200, {'Content-Type': 'text/plain'});
  res.end('Hello World\n');
}).listen(8124, "127.0.0.1");
console.log('Server running at http://127.0.0.1:8124/');
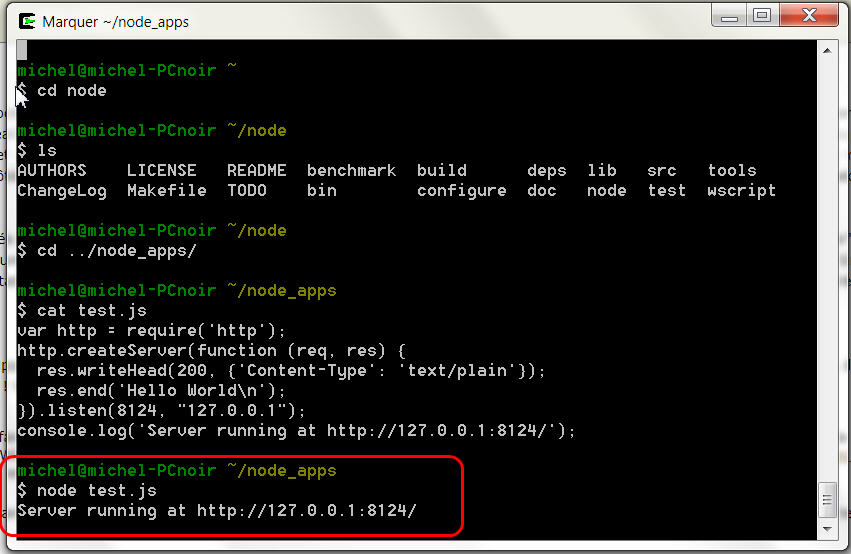
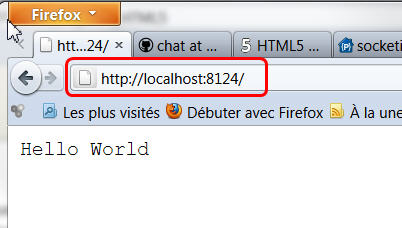
Save and run this command from the terminal: node test.js
You should see in your web browser:
The test.js file contains ultra minimal code for a web server. It answers to requests by sending string responses on the fly. If we want to serve HTML files, images, JS files, CSS files, we need a more complete web server. This is what the "express" module will bring. And we also need the socket.io modules for using WebSockets. NodeJS module installationWe will use the "npm" (node package manager) command from the nodeJS installation
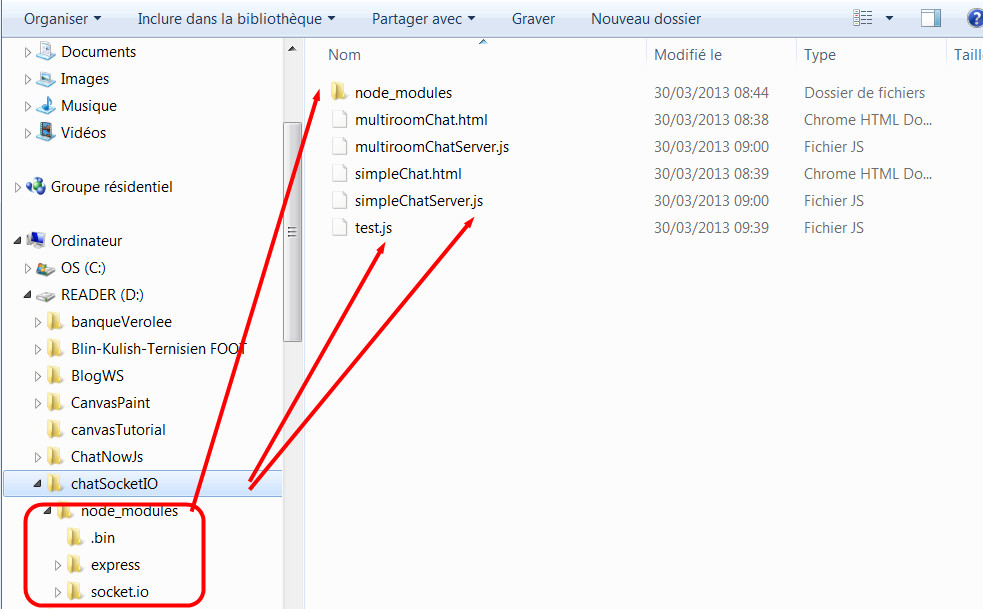
You should see a subdir named "node_modules" that contains the new modules you just downloaded/installed locally to your project. Simple chat application that uses express and socket.io This part is an updated/fixed version of this tutorial , that explains how to write a small chat with nodeJS, express andsocket.io. We cleaned the code and adapted it so it works with the last version of express (v3), and socket.io. Get this archive : chatSocketIO.rar Unarchive it in your working dir. You should get this;
Now run this command "node simpleChatServer.js" and open "http://localhost:8080", in your browser. Open th URL in two different tabs. Enter two different names, chat.Open Chrome dev tools you should find how to trace data exchanged over web sockets. Now, study the code of simpleChatServer.js, of simpleChat.html, and read : http://psitsmike.com/2011/09/node-js...chat-tutorial/, forget the beginning about nodeJS installation, just read the code explanations. socket.io basic principles
simpleChatServer.js: // We need to use the express framework: have a real web server that knows how to send mime types etc.
var express=require('express');
// Init globals variables for each module required
var app = express()
, http = require('http')
, server = http.createServer(app)
, io = require('socket.io').listen(server);
// Indicate where static files are located
app.configure(function () {
app.use(express.static(__dirname + '/'));
});
// launch the http server on given port
server.listen(8080);
// routing
app.get('/', function (req, res) {
res.sendfile(__dirname + '/simpleChat.html');
});
// usernames which are currently connected to the chat
var usernames = {};
io.sockets.on('connection', function (socket) {
// when the client emits 'sendchat', this listens and executes
socket.on('sendchat', function (data) {
// we tell the client to execute 'updatechat' with 2 parameters
io.sockets.emit('updatechat', socket.username, data);
});
// when the client emits 'adduser', this listens and executes
socket.on('adduser', function(username){
// we store the username in the socket session for this client
socket.username = username;
// add the client's username to the global list
usernames[username] = username;
// echo to client they've connected
socket.emit('updatechat', 'SERVER', 'you have connected');
// echo globally (all clients) that a person has connected
socket.broadcast.emit('updatechat', 'SERVER', username + ' has connected');
// update the list of users in chat, client-side
io.sockets.emit('updateusers', usernames);
});
// when the user disconnects.. perform this
socket.on('disconnect', function(){
// remove the username from global usernames list
delete usernames[socket.username];
// update list of users in chat, client-side
io.sockets.emit('updateusers', usernames);
// echo globally that this client has left
socket.broadcast.emit('updatechat', 'SERVER', socket.username + ' has disconnected');
});
});
Et la page simpleChat.html <script src="/socket.io/socket.io.js"></script>
<script src="https://ajax.googleapis.com/ajax/libs/jquery/1.6.4/jquery.min.js"></script>
<script>
var socket = io.connect(); // we might pass the URL of the WS server as parameter here
// on connection to server, ask for user's name with an anonymous callback
socket.on('connect', function(){
// call the server-side function 'adduser' and send one parameter (value of prompt)
socket.emit('adduser', prompt("What's your name?"));
});
// listener, whenever the server emits 'updatechat', this updates the chat body
socket.on('updatechat', function (username, data) {
$('#conversation').append('<b>'+username + ':</b> ' + data + '<br>');
});
// listener, whenever the server emits 'updateusers', this updates the username list
socket.on('updateusers', function(data) {
$('#users').empty();
$.each(data, function(key, value) {
$('#users').append('<div>' + key + '</div>');
});
});
// on load of page
$(function(){
// when the client clicks SEND
$('#datasend').click( function() {
var message = $('#data').val();
$('#data').val('');
// tell server to execute 'sendchat' and send along one parameter
socket.emit('sendchat', message);
});
// when the client hits ENTER on their keyboard
$('#data').keypress(function(e) {
if(e.which == 13) {
$(this).blur();
$('#datasend').focus().click();
}
});
});
</script>
<div style="float:left;width:100px;border-right:1px solid black;height:300px;padding:10px;overflow:scroll-y;">
<b>USERS</b>
<div id="users"></div>
</div>
<div style="float:left;width:300px;height:250px;overflow:scroll-y;padding:10px;">
<div id="conversation"></div>
<input id="data" style="width:200px;" />
<input type="button" id="datasend" value="send" />
</div>
Test d'une version "multi-rooms" permettant de gérer des "salles de chat"Dans cette version, on commence à se rapprocher d'une véritable plate-forme permettant de gérer des "sessions" permettant à plusieurs groupes d'utilisateur de participer en temps réel à un chat privé, de rejoindre d'autres salles de chat etc. Cet exemple porte en lui les éléments fondamentaux pour réaliser un serveur de jeux en réseau, remplacez "salle de chat" par "session de jeu" et vous avez tout compris. Imaginez qu'au lieu de taper du texte dans un champ de saisie, le code client qui tourne dans le navigateur envoie des objets JavaScript sur le même canal, par exemple {type:'position', player:'1', x:'120', y:'130'} ou {type:'event', value':endOfGame'}, et que le serveur les fasse passer aux autres clients connectés. Principes de gestion de "salles":
Il existe de nombreuses autres fonctions propres à la gestion de "salles" comme "connaitre la liste des salles, et qui est dedans, savoir dans quelle salle est un client donné, etc", voir ce tutorial en anglais très complet: https://github.com/LearnBoost/socket.io/wiki/Rooms multiRoomChatServer.js // We need to use the express framework: have a real web server that knows how to send mime types etc.
var express=require('express');
// Init globals variables for each module required
var app = express()
, http = require('http')
, server = http.createServer(app)
, io = require('socket.io').listen(server);
// Indicate where static files are located. Without this, no external js file, no css...
app.configure(function () {
app.use(express.static(__dirname + '/'));
});
// launch the http server on given port
server.listen(8080);
// routing with express, mapping for default page
app.get('/', function (req, res) {
res.sendfile(__dirname + '/multiRoomChat.html');
});
// usernames which are currently connected to the chat
var usernames = {};
// rooms which are currently available in chat
var rooms = ['room1','room2','room3'];
io.sockets.on('connection', function (socket) {
// when the client emits 'adduser', this listens and executes
socket.on('adduser', function(username){
// store the username in the socket session for this client
socket.username = username;
// store the room name in the socket session for this client
socket.room = 'room1';
// add the client's username to the global list
usernames[username] = username;
// send client to room 1
socket.join('room1');
// echo to client they've connected
socket.emit('updatechat', 'SERVER', 'you have connected to room1');
// echo to room 1 that a person has connected to their room
socket.broadcast.to('room1').emit('updatechat', 'SERVER', username + ' has connected to this room');
socket.emit('updaterooms', rooms, 'room1');
});
// when the client emits 'sendchat', this listens and executes
socket.on('sendchat', function (data) {
// we tell the client to execute 'updatechat' with 2 parameters
io.sockets.in(socket.room).emit('updatechat', socket.username, data);
});
socket.on('switchRoom', function(newroom){
socket.leave(socket.room);
socket.join(newroom);
socket.emit('updatechat', 'SERVER', 'you have connected to '+ newroom);
// sent message to OLD room
socket.broadcast.to(socket.room).emit('updatechat', 'SERVER', socket.username+' has left this room');
// update socket session room title
socket.room = newroom;
socket.broadcast.to(newroom).emit('updatechat', 'SERVER', socket.username+' has joined this room');
socket.emit('updaterooms', rooms, newroom);
});
// when the user disconnects.. perform this
socket.on('disconnect', function(){
// remove the username from global usernames list
delete usernames[socket.username];
// update list of users in chat, client-side
io.sockets.emit('updateusers', usernames);
// echo globally that this client has left
socket.broadcast.emit('updatechat', 'SERVER', socket.username + ' has disconnected');
socket.leave(socket.room);
});
});
multiRoomChat.html <script src="/socket.io/socket.io.js"></script>
<script src="https://ajax.googleapis.com/ajax/libs/jquery/1.6.4/jquery.min.js"></script>
<script>
//var socket = io.connect('http://localhost:8080');
var socket = io.connect('http://localhost:8080');
// on connection to server, ask for user's name with an anonymous callback
socket.on('connect', function(){
// call the server-side function 'adduser' and send one parameter (value of prompt)
socket.emit('adduser', prompt("What's your name?"));
});
// listener, whenever the server emits 'updatechat', this updates the chat body
socket.on('updatechat', function (username, data) {
$('#conversation').append('<b>'+username + ':</b> ' + data + '<br>');
});
// listener, whenever the server emits 'updaterooms', this updates the room the client is in
socket.on('updaterooms', function(rooms, current_room) {
$('#rooms').empty();
$.each(rooms, function(key, value) {
if(value == current_room){
$('#rooms').append('<div>' + value + '</div>');
}
else {
$('#rooms').append('<div><a href="#" onclick="switchRoom(\''+value+'\')">' + value + '</a></div>');
}
});
});
function switchRoom(room){
socket.emit('switchRoom', room);
}
// on load of page
$(function(){
// when the client clicks SEND
$('#datasend').click( function() {
var message = $('#data').val();
$('#data').val('');
// tell server to execute 'sendchat' and send along one parameter
socket.emit('sendchat', message);
});
// when the client hits ENTER on their keyboard
$('#data').keypress(function(e) {
if(e.which == 13) {
$(this).blur();
$('#datasend').focus().click();
}
});
});
</script>
<div style="float:left;width:100px;border-right:1px solid black;height:300px;padding:10px;overflow:scroll-y;">
<b>ROOMS</b>
<div id="rooms"></div>
</div>
<div style="float:left;width:300px;height:250px;overflow:scroll-y;padding:10px;">
<div id="conversation"></div>
<input id="data" style="width:200px;" />
<input type="button" id="datasend" value="send" />
</div>
Prenez la peine d'étudier ce code. Les explications détaillées de l'exemple dont nous sommes servi sont ici : http://psitsmike.com/2011/10/node-js-and-socket-io-multiroom-chat-tutorial/ (mais le code a été mis à jour afin de coller aux nouvelles versions de express et socket.io) Integration du chat de base (pour commencer) au TP2 (le mini jeu)Reprenez le fichier HTML du TP2 (le mini jeu, qui était à rendre, au passage) et intégrez le code du chat. Si vous faites un peu attention, il est possible de faire ça proprement en mettant le code JavaScript dans un fichier chat.js par exemple, ajoutez juste à la page les parties HTML. Modifiez simplement le code de simpleChatServer.js pour qu'il serve la page HTML avec le bon nom (celle de votre jeu). Testez en lancant "node simpleChatServer.js", normalement si tout va bien votre jeu marche et le chat aussi. Maintenant essayez d'envoyer, lorsqu'un joueur se déplace, sa position par le canal du chat, sous la forme d'une chaine de caractères : "le joueur 1 s'est déplacé vers la position x,y"... Normalement cela doit générer pas mal de trafic dans le chat mais dans les tabs/fenêtres de tous les joueurs on doit voir défiler les déplacements des différents joueurs connectés. Essayez maintenant d'envoyer non pas ces messages sous forme de chaines de caractères, mais directement des objets JavaScript. Vous pourrez vous inspirez de cet exemple complet et très court qui montre comment partager une position avec NodeJS et socket.io (exemple en bas de la page) : http://stackoverflow.com/questions/9865167/socket-io-and-complex-json-with-node-js-jquery Testez donc que vous avez bien reçu une position en tant qu'objet. Synchroniser les positions des joueurs quand ils bougentMaintenant que vous avez compris le principe, et bien il ne reste plus qu'à dessiner les joueurs dont on vient de recevoir la position là où il faut afin que les "vues" des différents joueurs soient syncrhonisées. Bon, normalement, pour faire un vrai jeu il y a encore pas mal de travail. La bonne manière de gérer un jeu en réseau est d'avoir un état complet sur le serveur afin de gérer les joueurs qui arrivent en cours de partie, les deconnexions, le lag, etc. Chaque code client tournant dans le navigateur a une copie synchronisée de cet état. Lire cet article très intéressant sur la manière dont on doit gérer un jeu en réseau: http://gafferongames.com/networking-...me-networking/ Pour l'écriture d'un jeu HTML5, beaucoup d'information dans http://io-2011-html5-games.appspot.com, attention cependant ils utilisent du JavaScript objet assez avancé. Il existe aussi des livres sur la programmation de jeux multi joueurs en HTML5/NodeJS comme par exemple http://books.google.fr/books?id=Lq5h9QrCzUUC&printsec=frontcover&hl=fr#v=onepage&q&f=false Trucs et astuces pour améliorer votre jeuLe site http://www.mapeditor.org/ propose un outil pour générer des "maps" basées sur des "tiles", des images répétitives, mais sans aller aussi loin, il permet de générer au format JSON des formes polygonales dans le menu "layers/masks", pour mettre sur les cartes des masques de collision. Il est très facile de lire ce format côté serveur:
Il est possible de détecter des collisions avec un polygone fermé à l'aide de la fonction context.isPointInPath() de l'API HTML5 (il faudra évidemment tester pour chaque côté du polygone). Voir : http://digitalarts.bgsu.edu/faculty/bonniem/Spring11/artc4330_1/notes/notes26.html
|
Powered by MindTouch Deki Open Source Edition v.8.08 |