|
|
HTML5 tutorial for WWW 2013: study two chat programs
De $1
Introduction
In this tutorial we will learn how to use HTML5 WebSockets.
We need a server that supports this protocol. We will use the NodeJS server, a very popular server for writing web applications that use WebSockets or for writing HTML5 games. It's a small, powerful server, that embeds the V8 JavaScript interpreter (the one in Chrome), enablind server side JavaScript.
We will look at two versions of a small chat application, that use the socket.io and express modules for NodeJS. Socket.io brings weNotice that socket.io has also implementations server side for Java, C#, Android, etc).
Installation of NodeJS and of the express and socket.io modules
Go to http://www.nodejs.org and install the last version of NodeJS. Click on the install button on the web page.
Check the installation. Open a terminal window, type "node --version", this should print something like: "node 0.10.x".
Test of a first NodeJS application
- Create somewhere a file names test.js, with this content
- var http = require('http');
- http.createServer(function (req, res) {
- res.writeHead(200, {'Content-Type': 'text/plain'});
- res.end('Hello World\n');
- }).listen(8124, "127.0.0.1");
- console.log('Server running at http://127.0.0.1:8124/');
var http = require('http');
http.createServer(function (req, res) {
  res.writeHead(200, {'Content-Type': 'text/plain'});
  res.end('Hello World\n');
}).listen(8124, "127.0.0.1");
console.log('Server running at http://127.0.0.1:8124/');
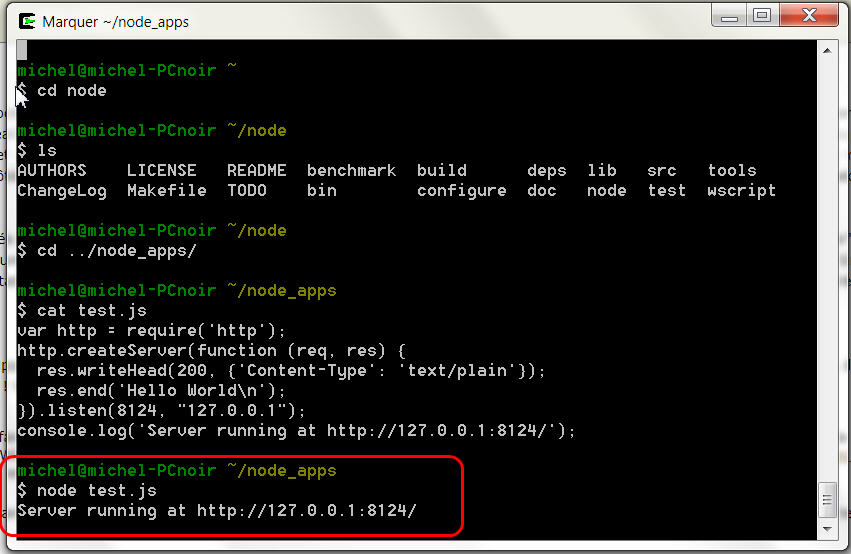
Save and run this command from the terminal:
node test.js
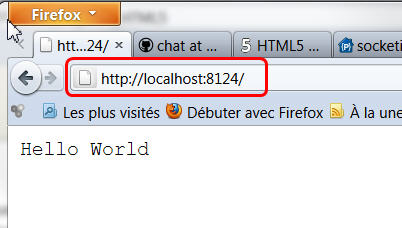
You just ran your first nodeJS application, try it with a Web browser by opening: http://localhost:8124

You should see this in your web browser:

The test.js file contains ultra minimal code for creating and configuring an HTTP web server. This ultra minimal server answers requests by sending string responses on the fly. If we want to serve HTML files, images, JS files, CSS files, we need a more complete web server. This is what the "express" module will bring to NodeJS. And we will also need the socket.io module for using WebSockets.
NodeJS module installation
We will use the "npm" (node package manager) command from the nodeJS installation
- Create a directory named "chatWithSocketIO" somewhere
- cd in it,
- run "npm install express",
- run "npm install socket.io".
You should see a subdir named "node_modules" that contains the new modules you just downloaded/installed locally to your project.
TROUBLESHOOTING guide:
Beware, if you need a proxy to access the internet, first run 'npm set proxy your_proxy_http address', like in these examples:
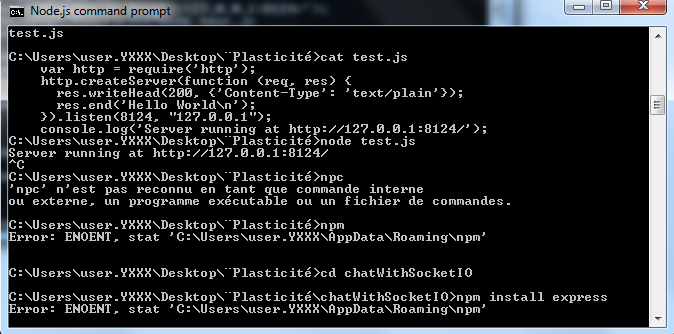
If ERROR "nodejs/windows Error: ENOENT, stat 'C:\Users\RT\AppData\Roaming\npm' under windows, like in the screenshot below, then create the dir by hand and run npm install, it should work.

Simple chat application that uses express and socket.io
This part is an updated/fixed version of this tutorial , that explains how to write a small chat application with nodeJS, express and socket.io. We cleaned the code and adapted it so it works with the last version of express (v3), and socket.io.
Get this archive : chatSocketIOFIxedv2.zip
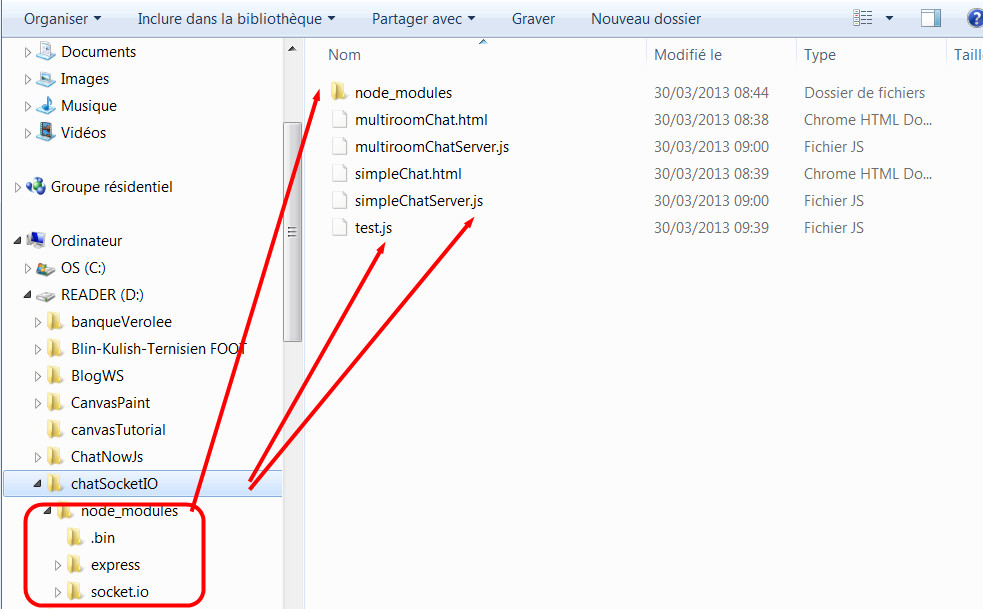
Unarchive it in your working dir. You should get this;

Now run this command "node simpleChatServer.js" and open "http://localhost:8080", in your browser.
Open th URL in two different tabs. Enter two different names, try to chat, look at what happens in the different tabs.Open Chrome dev tools, you should find how to trace data exchanged over web sockets.
Now, study the code of simpleChatServer.js, of simpleChat.html, and read : http://psitsmike.com/2011/09/node-js...chat-tutorial/, forget the beginning about the nodeJS installation, just read the code explanations.
socket.io basic principles
- socket.on(event_name, callback) : executes the callback when an event with a given name is fired. (event_name = user defined). Some events like 'connection' or 'disconnect' are predefined.
- All event processing is performed in the io.sockets.on('connection', function (socket) {...}, call.
- socket.emit(event_name, data1, data2): sends only to the connected client the event and two parameters with data
- io.sockets.emit(event_name, data1, data2): same but sends to all connected clients
- socket.broadcast.emit(event_name, data1, data2): same but sends to all connected clients except the emitter
simpleChatServer.js:
-
- var express=require('express');
-
-
- var app = express()
- , http = require('http')
- , server = http.createServer(app)
- , io = require('socket.io').listen(server);
-
-
- app.use(express.static(__dirname + '/'));
-
-
-
- server.listen(8080);
-
-
- app.get('/', function (req, res) {
- res.sendfile(__dirname + '/simpleChat.html');
- });
-
-
- var usernames = {};
-
- io.sockets.on('connection', function (socket) {
-
-
- socket.on('sendchat', function (data) {
-
- io.sockets.emit('updatechat', socket.username, data);
- });
-
-
- socket.on('adduser', function(username){
-
- socket.username = username;
-
- usernames[username] = username;
-
- socket.emit('updatechat', 'SERVER', 'you have connected');
-
- socket.broadcast.emit('updatechat', 'SERVER', username + ' has connected');
-
- io.sockets.emit('updateusers', usernames);
- });
-
-
- socket.on('disconnect', function(){
-
- delete usernames[socket.username];
-
- io.sockets.emit('updateusers', usernames);
-
- socket.broadcast.emit('updatechat', 'SERVER', socket.username + ' has disconnected');
- });
- });
// We need to use the express framework: have a real web server that knows how to send mime types etc.
var express=require('express');

// Init globals variables for each module required
var app = express()
  , http = require('http')
  , server = http.createServer(app)
  , io = require('socket.io').listen(server);

// Indicate where static files are located
app.use(express.static(__dirname + '/'));


// launch the http server on given port
server.listen(8080);

// routing
app.get('/', function (req, res) {
  res.sendfile(__dirname + '/simpleChat.html');
});

// usernames which are currently connected to the chat
var usernames = {};

io.sockets.on('connection', function (socket) {

	// when the client emits 'sendchat', this listens and executes
	socket.on('sendchat', function (data) {
		// we tell the client to execute 'updatechat' with 2 parameters
		io.sockets.emit('updatechat', socket.username, data);
	});

	// when the client emits 'adduser', this listens and executes
	socket.on('adduser', function(username){
		// we store the username in the socket session for this client
		socket.username = username;
		// add the client's username to the global list
		usernames[username] = username;
		// echo to client they've connected
		socket.emit('updatechat', 'SERVER', 'you have connected');
		// echo globally (all clients) that a person has connected
		socket.broadcast.emit('updatechat', 'SERVER', username + ' has connected');
		// update the list of users in chat, client-side
		io.sockets.emit('updateusers', usernames);
	});

	// when the user disconnects.. perform this
	socket.on('disconnect', function(){
		// remove the username from global usernames list
		delete usernames[socket.username];
		// update list of users in chat, client-side
		io.sockets.emit('updateusers', usernames);
		// echo globally that this client has left
		socket.broadcast.emit('updatechat', 'SERVER', socket.username + ' has disconnected');
	});
});
And simpleChat.html:
- <script src="/socket.io/socket.io.js"></script>
- <script src="https://ajax.googleapis.com/ajax/libs/jquery/1.6.4/jquery.min.js"></script>
- <script>
- var socket = io.connect(); // we might pass the URL of the WS server as parameter here
-
- // on connection to server, ask for user's name with an anonymous callback
- socket.on('connect', function(){
- // call the server-side function 'adduser' and send one parameter (value of prompt)
- socket.emit('adduser', prompt("What's your name?"));
- });
-
- // listener, whenever the server emits 'updatechat', this updates the chat body
- socket.on('updatechat', function (username, data) {
- $('#conversation').append('<b>'+username + ':</b> ' + data + '<br>');
- });
-
- // listener, whenever the server emits 'updateusers', this updates the username list
- socket.on('updateusers', function(data) {
- $('#users').empty();
- $.each(data, function(key, value) {
- $('#users').append('<div>' + key + '</div>');
- });
- });
-
- // on load of page
- $(function(){
- // when the client clicks SEND
- $('#datasend').click( function() {
- var message = $('#data').val();
- $('#data').val('');
- // tell server to execute 'sendchat' and send along one parameter
- socket.emit('sendchat', message);
- });
-
- // when the client hits ENTER on their keyboard
- $('#data').keypress(function(e) {
- if(e.which == 13) {
- $(this).blur();
- $('#datasend').focus().click();
- }
- });
- });
-
- </script>
- <div style="float:left;width:100px;border-right:1px solid black;height:300px;padding:10px;overflow:scroll-y;">
- <b>USERS</b>
- <div id="users"></div>
- </div>
- <div style="float:left;width:300px;height:250px;overflow:scroll-y;padding:10px;">
- <div id="conversation"></div>
- <input id="data" style="width:200px;" />
- <input type="button" id="datasend" value="send" />
- </div>
<script src="/socket.io/socket.io.js"></script>
<script src="https://ajax.googleapis.com/ajax/libs/jquery/1.6.4/jquery.min.js"></script>
<script>
	var socket = io.connect(); // we might pass the URL of the WS server as parameter here

	// on connection to server, ask for user's name with an anonymous callback
	socket.on('connect', function(){
		// call the server-side function 'adduser' and send one parameter (value of prompt)
		socket.emit('adduser', prompt("What's your name?"));
	});

	// listener, whenever the server emits 'updatechat', this updates the chat body
	socket.on('updatechat', function (username, data) {
		$('#conversation').append('<b>'+username + ':</b> ' + data + '<br>');
	});

	// listener, whenever the server emits 'updateusers', this updates the username list
	socket.on('updateusers', function(data) {
		$('#users').empty();
		$.each(data, function(key, value) {
			$('#users').append('<div>' + key + '</div>');
		});
	});

	// on load of page
	$(function(){
		// when the client clicks SEND
		$('#datasend').click( function() {
			var message = $('#data').val();
			$('#data').val('');
			// tell server to execute 'sendchat' and send along one parameter
			socket.emit('sendchat', message);
		});

		// when the client hits ENTER on their keyboard
		$('#data').keypress(function(e) {
			if(e.which == 13) {
				$(this).blur();
				$('#datasend').focus().click();
			}
		});
	});

</script>
<div style="float:left;width:100px;border-right:1px solid black;height:300px;padding:10px;overflow:scroll-y;">
	<b>USERS</b>
	<div id="users"></div>
</div>
<div style="float:left;width:300px;height:250px;overflow:scroll-y;padding:10px;">
	<div id="conversation"></div>
	<input id="data" style="width:200px;" />
	<input type="button" id="datasend" value="send" />
</div>
Multiroom chat: several groups of clients can chat together
This version enable clients to be in groups called "rooms". The Socket.io API has a complete set of functions for joining/leaving a room, sending messages to all people in a room, to all people except the emitter, etc.
- socket.join(room_name) and socket.leave(room_name) : when joining a non existing room it creates it,
- socket.broadcast.to(room_name).emit(...): similar to socket.broadcast.emit, sends a message to all clients in the room except the emitter.
- io.sockets.inroom_name).emit(...) : sends to all clients in the room.
Complete documentation of the room API: https://github.com/LearnBoost/socket.io/wiki/Rooms
multiRoomChatServer.js
-
- var express=require('express');
-
-
- var app = express()
- , http = require('http')
- , server = http.createServer(app)
- , io = require('socket.io').listen(server);
-
-
- app.use(express.static(__dirname + '/'));
-
-
-
- server.listen(8080);
-
-
- app.get('/', function (req, res) {
- res.sendfile(__dirname + '/multiRoomChat.html');
- });
-
-
- var usernames = {};
-
-
- var rooms = ['room1','room2','room3'];
-
- io.sockets.on('connection', function (socket) {
-
-
- socket.on('adduser', function(username){
-
- socket.username = username;
-
- socket.room = 'room1';
-
- usernames[username] = username;
-
- socket.join('room1');
-
- socket.emit('updatechat', 'SERVER', 'you have connected to room1');
-
- socket.broadcast.to('room1').emit('updatechat', 'SERVER', username + ' has connected to this room');
- socket.emit('updaterooms', rooms, 'room1');
- });
-
-
- socket.on('sendchat', function (data) {
-
- io.sockets.in(socket.room).emit('updatechat', socket.username, data);
- });
-
- socket.on('switchRoom', function(newroom){
- socket.leave(socket.room);
- socket.join(newroom);
- socket.emit('updatechat', 'SERVER', 'you have connected to '+ newroom);
-
- socket.broadcast.to(socket.room).emit('updatechat', 'SERVER', socket.username+' has left this room');
-
- socket.room = newroom;
- socket.broadcast.to(newroom).emit('updatechat', 'SERVER', socket.username+' has joined this room');
- socket.emit('updaterooms', rooms, newroom);
- });
-
-
-
- socket.on('disconnect', function(){
-
- delete usernames[socket.username];
-
- io.sockets.emit('updateusers', usernames);
-
- socket.broadcast.emit('updatechat', 'SERVER', socket.username + ' has disconnected');
- socket.leave(socket.room);
- });
- });
// We need to use the express framework: have a real web server that knows how to send mime types etc.
var express=require('express');

// Init globals variables for each module required
var app = express()
  , http = require('http')
  , server = http.createServer(app)
  , io = require('socket.io').listen(server);

// Indicate where static files are located. Without this, no external js file, no css...
app.use(express.static(__dirname + '/'));


// launch the http server on given port
server.listen(8080);

// routing with express, mapping for default page
app.get('/', function (req, res) {
  res.sendfile(__dirname + '/multiRoomChat.html');
});

// usernames which are currently connected to the chat
var usernames = {};

// rooms which are currently available in chat
var rooms = ['room1','room2','room3'];

io.sockets.on('connection', function (socket) {

	// when the client emits 'adduser', this listens and executes
	socket.on('adduser', function(username){
		// store the username in the socket session for this client
		socket.username = username;
		// store the room name in the socket session for this client
		socket.room = 'room1';
		// add the client's username to the global list
		usernames[username] = username;
		// send client to room 1
		socket.join('room1');
		// echo to client they've connected
		socket.emit('updatechat', 'SERVER', 'you have connected to room1');
		// echo to room 1 that a person has connected to their room
		socket.broadcast.to('room1').emit('updatechat', 'SERVER', username + ' has connected to this room');
		socket.emit('updaterooms', rooms, 'room1');
	});

	// when the client emits 'sendchat', this listens and executes
	socket.on('sendchat', function (data) {
		// we tell the client to execute 'updatechat' with 2 parameters
		io.sockets.in(socket.room).emit('updatechat', socket.username, data);
	});

	socket.on('switchRoom', function(newroom){
		socket.leave(socket.room);
		socket.join(newroom);
		socket.emit('updatechat', 'SERVER', 'you have connected to '+ newroom);
		// sent message to OLD room
		socket.broadcast.to(socket.room).emit('updatechat', 'SERVER', socket.username+' has left this room');
		// update socket session room title
		socket.room = newroom;
		socket.broadcast.to(newroom).emit('updatechat', 'SERVER', socket.username+' has joined this room');
		socket.emit('updaterooms', rooms, newroom);
	});


	// when the user disconnects.. perform this
	socket.on('disconnect', function(){
		// remove the username from global usernames list
		delete usernames[socket.username];
		// update list of users in chat, client-side
		io.sockets.emit('updateusers', usernames);
		// echo globally that this client has left
		socket.broadcast.emit('updatechat', 'SERVER', socket.username + ' has disconnected');
		socket.leave(socket.room);
	});
});
multiRoomChat.html
- <script src="/socket.io/socket.io.js"></script>
- <script src="https://ajax.googleapis.com/ajax/libs/jquery/1.6.4/jquery.min.js"></script>
- <script>
-
- var socket = io.connect('http://localhost:8080');
-
-
- socket.on('connect', function(){
-
- socket.emit('adduser', prompt("What's your name?"));
- });
-
-
- socket.on('updatechat', function (username, data) {
- $('#conversation').append('<b>'+username + ':</b> ' + data + '<br>');
- });
-
-
- socket.on('updaterooms', function(rooms, current_room) {
- $('#rooms').empty();
- $.each(rooms, function(key, value) {
- if(value == current_room){
- $('#rooms').append('<div>' + value + '</div>');
- }
- else {
- $('#rooms').append('<div><a href="#" onclick="switchRoom(\''+value+'\')">' + value + '</a></div>');
- }
- });
- });
-
- function switchRoom(room){
- socket.emit('switchRoom', room);
- }
-
-
- $(function(){
-
- $('#datasend').click( function() {
- var message = $('#data').val();
- $('#data').val('');
-
- socket.emit('sendchat', message);
- });
-
-
- $('#data').keypress(function(e) {
- if(e.which == 13) {
- $(this).blur();
- $('#datasend').focus().click();
- }
- });
- });
-
- </script>
- <div style="float:left;width:100px;border-right:1px solid black;height:300px;padding:10px;overflow:scroll-y;">
- <b>ROOMS</b>
- <div id="rooms"></div>
- </div>
- <div style="float:left;width:300px;height:250px;overflow:scroll-y;padding:10px;">
- <div id="conversation"></div>
- <input id="data" style="width:200px;" />
- <input type="button" id="datasend" value="send" />
- </div>
<script src="/socket.io/socket.io.js"></script>
<script src="https://ajax.googleapis.com/ajax/libs/jquery/1.6.4/jquery.min.js"></script>
<script>
	//var socket = io.connect('http://localhost:8080');
    var socket = io.connect('http://localhost:8080');

	// on connection to server, ask for user's name with an anonymous callback
	socket.on('connect', function(){
		// call the server-side function 'adduser' and send one parameter (value of prompt)
		socket.emit('adduser', prompt("What's your name?"));
	});

	// listener, whenever the server emits 'updatechat', this updates the chat body
	socket.on('updatechat', function (username, data) {
		$('#conversation').append('<b>'+username + ':</b> ' + data + '<br>');
	});

	// listener, whenever the server emits 'updaterooms', this updates the room the client is in
	socket.on('updaterooms', function(rooms, current_room) {
		$('#rooms').empty();
		$.each(rooms, function(key, value) {
			if(value == current_room){
				$('#rooms').append('<div>' + value + '</div>');
			}
			else {
				$('#rooms').append('<div><a href="#" onclick="switchRoom(\''+value+'\')">' + value + '</a></div>');
			}
		});
	});

	function switchRoom(room){
		socket.emit('switchRoom', room);
	}

	// on load of page
	$(function(){
		// when the client clicks SEND
		$('#datasend').click( function() {
			var message = $('#data').val();
			$('#data').val('');
			// tell server to execute 'sendchat' and send along one parameter
			socket.emit('sendchat', message);
		});

		// when the client hits ENTER on their keyboard
		$('#data').keypress(function(e) {
			if(e.which == 13) {
				$(this).blur();
				$('#datasend').focus().click();
			}
		});
	});

</script>
<div style="float:left;width:100px;border-right:1px solid black;height:300px;padding:10px;overflow:scroll-y;">
	<b>ROOMS</b>
	<div id="rooms"></div>
</div>
<div style="float:left;width:300px;height:250px;overflow:scroll-y;padding:10px;">
	<div id="conversation"></div>
	<input id="data" style="width:200px;" />
	<input type="button" id="datasend" value="send" />
</div>
Code explanations here: http://psitsmike.com/2011/10/node-js-and-socket-io-multiroom-chat-tutorial/ (we made small updates to the code)
|


