 |
Weblogic / Java EE6 FAQ and Guides
De $1
Weblogic / Java EE6 FAQ and Guides
Introduction
This page is a good reminder for the Java EE6 developper that plan to use Eclipse indigo with weblogic 12c or greater for developping Servlets/JSPs/EJB/JMS applications.
Installing Java DB + sample database + DataSource in Eclipse + in Weblogic
Install and Launch JavaDB
- Get this archive that contains JavaDB 10.x + a sample database : javadb.zip,
- Unzip it somewhere,
- go to <java db install dir>/bin and run startNetworkServer.bat
- Notice the presence in the bin dir of a directory named "sample". This is an example database. By default, the derby server locates databases in the bin dir.
Add the connection to the DB admin tool in Eclipse java EE perspective
- In Eclipse, in the Java EE perspective, locate a tab called "Data Source Explorer", right click on "Database Connections" and choose "New" in order to add a new connection.
- In the next dialog, type in "Der" and choose "Derby" as the database type, click next
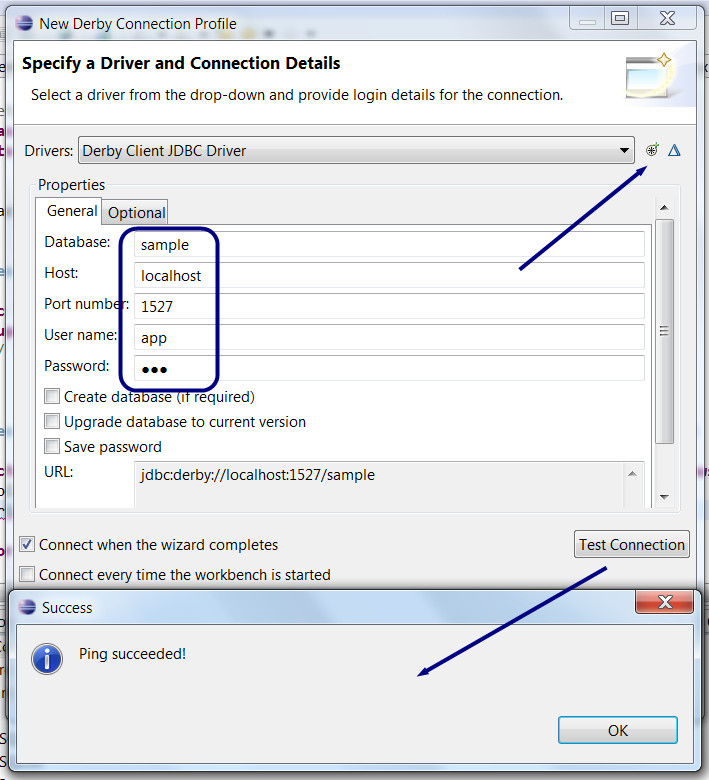
- Then you must indicate which JDBC driver you are going to use. Choose "Derby Client JDBC driver 10.1", but this is not enough, you need to set the proper jar file to use. So click on the small rounded button at the right '"new driver definition", then on the "jar list" tab. Remove proposed jar and click on the "add jar/zip" button on the right.
- Go to <java db install dir>/lib and select the derbyclient.jar file.
- Enter the sample database infos: sample/localhost/1527/app/app (app is both the value for user and for password). Unselect the "create database" button. Click on the "test connection" button on the right.
Add the DataSource to Weblogic 12c
In WebLogic 12c, run the admin server from the windows start menu, then open the weblogic admin console (also from start menu).
- Go to the "source de données"/datasources link in the main page. Click on it
- Use the nouveau/new button in order to add a datasource,
- Select "source de données generiques"/generic datasource in the drop down menu
- Next dialog : enter a name for the database : I suggest "SerbySample", enter a JNDI name for accessing the database from a java EE application. I suggest "sample". Choose "Derby" as the database type. CLick next.
- Next dialog click next in order to validate the JDBC driver proposed by default (WebLogic comes with the Derby driver pre-installed)
- Next dialog: click next (transactions options),
- Next dialog: enter the same infos as when you connected the database to Eclipse: sample/localhost/1527/app/app cick Next
- Next dialog, click "Test the connection", if everything is ok, click next,
- Next dialog, check the AdminServer as a target for this database. Do not forget to select the target server otherwise your datasource will not be exposed to external applications.
- Click finish.
Installing a MySQL database
We will proceed exactly like we did for javaDB, the only thing that changes is the way we will launch the MySQL server and the name of the JDBC driver.
- Get this standalone version of MySQL and the jdbc driver achives from the kit that has been given to you,
- Unzip the mysql-noinstall-5.1.35-win32.zip somewhere, we suggest in C:
- Unzip the mysql-connector-java-5.1.14.zip file somewhere and copy the JDBC driver jar file named mysql-connector-java-5.1.14-bin.jar in your MySQL install dir, for convenience (it will be easier to locate when we will need it)
- In order to run MySQL, go to the bin dir and run mysqld.exe. In order to stop the server, just ctrl-c in the DOS window or close the window. If you prefer to run MySQL as a service, you may read this small guide on how to administrate MySQL: MySQL install guidel.pdf and if you do not know anything about MySQL you may read this crash course in english (but very clear, 20 powerpoint slides): Intro to MySQL.ppt
- The MySQL JDBC driver is already installed in WebLogic but not in Eclipse, in order to be able to add a datasource to the Data sources tab in the Java EE perspective of Eclipse, you will have to proceed like we did for JavaDB, see the previous section. You will have to remove the proposed jar file and add the one from step 3.
Writing a remote client standalone for an EJB
You must have at least one EJB that implements a remote interface. Example :
package sessions;

import javax.ejb.LocalBean;
import javax.ejb.Stateless;

/**
* Session Bean implementation class Test
*/
@Stateless
@LocalBean
public class DemoSessionEJBRemote implements TestRemote {

   public DemoSessionEJBRemote() {
        // TODO Auto-generated constructor stub
    }

   public String helloWorld() {    return "hello world !";
   }}
And here is the remote interface (located in the Client project that is automatically created when we do an EAR project):
package sessions;

import javax.ejb.Remote;

@Remote
public interface TestRemote {
    public String helloWorld();
}
The client project is just a Java project, but you must add two things so that it compiles and run:
- Add the EJB project in the build path (the project that contains the EJB you are going to call)
- Add wlfullclient.jar, a jar with all the client libs you need. This jar needs to be built once, using a command line interface cd in the WEBLOGIC_INSTALL_LIB/server/lib, then run the command "java -jar wljarbuilder.jar". This will take 30s to build the client lib for your installation. At the end, you should find a wlfullclient.jar file. Add it to your build path.
Then you should have such a source code for the standalone client:
package client;

import java.util.Hashtable;import javax.naming.Context;
import javax.naming.InitialContext;
import javax.naming.NamingException;
import sessions.TestRemote;

public class StandAloneClient {
    private static String INITIAL_CONTEXT_NAME = "weblogic.jndi.WLInitialContextFactory";
    private static String PROVIDER_URL = "t3://localhost:7001";
    private static String JNDI_NAME = "java:global.DemoEAR.DemoEJB.DemoSessionEJBRemote!sessions.TestRemote";

    public static void main(String[] args) throws Exception {
        Context ctx = getInitialContext();
        TestRemote helloEJB = (TestRemote) ctx.lookup(JNDI_NAME);
        System.out.println(helloEJB.helloWorld());
        }

    private static Context getInitialContext() throws NamingException {
        Hashtable env = new Hashtable();
        env.put(Context.INITIAL_CONTEXT_FACTORY, INITIAL_CONTEXT_NAME);
        env.put(Context.PROVIDER_URL, PROVIDER_URL);
        return new InitialContext(env);
    }
}
Use JMS and a Message Driven Bean on Weblogic
Writing a message driven bean
Note: Message Driven Beans are not supported by the JavaEE 6 "Web profile" (all in one projects with jsf/jsp/servlets/ejb/jpa in one single project, deployed as a single war file). For MDB you need to create an EAR project, and an EJB project (maybe with JPA facet), and maybe a Dynamic Web project (for jsf/jsp/servlets). The MDB should be added into the EJB project. The client servlet we demonstrate here should be added in the dynamic web project.
Normally the Eclipse wizard should ask you for the names of the connexion factory + destination. Here is an example of a MDB that works with the client from the next section.
- Check that the name used in the MDB is the same as the JNDI name you can find in the JNDI tree for your weblogic server. You can do that by looking at the weblogic admin console, on the left, click on "base_domain", then "servers", then in the main page click on the name of your server, then in the main window you should have something like "JNDI tree"... Click on that, a new tab opens in which you can explore the names objects on your server. In the small tree, click on "weblogic" then "jms" then on the connection factory and destination. You will find in the detailed view the JNDI names.
Example MDB:
package sessions;

import javax.ejb.ActivationConfigProperty;
import javax.ejb.MessageDriven;
import javax.jms.JMSException;
import javax.jms.Message;
import javax.jms.MessageListener;
import javax.jms.TextMessage;

@MessageDriven(
		activationConfig = { @ActivationConfigProperty(
				propertyName = "destinationType", propertyValue = "javax.jms.Queue"
		) },
		mappedName = "weblogic.jms.DemoQueue")
public class TestMDB implements MessageListener {

    public TestMDB() {
        // TODO Auto-generated constructor stub
    	System.out.println("TestMDB : NEW INSTANCE BUILT !");
    }

    public void onMessage(Message message) {
        if(message instanceof TextMessage) {


        	TextMessage txtMsg = (TextMessage) message;
        	try {
				String msg = txtMsg.getText();
				System.out.println("Message received: " + msg);
				System.out.println("Processing message");
		    	Thread.sleep(5000);
		    	System.out.println("End of processing message");
			} catch (Exception e) {
				// TODO Auto-generated catch block
				e.printStackTrace();
			}


        }

    }

}
Writing a client for a weblogic queue
Here is an example of a servlet that sends messages to the previous message driven bean. In fact it doesn't know the actual receiver of the message, it just knows the destination where the message is being sent.
Again, double check the names of the connection factory and of the destination. They should exactly match the ones in the weblogic admin console and the ones in the MDB.
package servlets;

import java.io.IOException;
import java.util.Collection;
import java.util.logging.Level;
import java.util.logging.Logger;

import javax.annotation.Resource;
import javax.ejb.EJB;
import javax.jms.Connection;
import javax.jms.ConnectionFactory;
import javax.jms.JMSException;
import javax.jms.MessageProducer;
import javax.jms.Queue;
import javax.jms.Session;
import javax.jms.TextMessage;
import javax.servlet.ServletException;
import javax.servlet.ServletOutputStream;
import javax.servlet.annotation.WebServlet;
import javax.servlet.http.HttpServlet;
import javax.servlet.http.HttpServletRequest;
import javax.servlet.http.HttpServletResponse;

import entities.Book;

import sessions.BookFacade;
import sessions.DemoSessionEJB;

/**
 * Servlet implementation class DemoServlet
 */
@WebServlet("/DemoServlet")
public class DemoServlet extends HttpServlet {
	private static final long serialVersionUID = 1L;


    // For JMS and the MessageDrivenBean
    @Resource(name = "weblogic.jms.DemoQueue")
    private Queue demoQueue;
    @Resource(name = "weblogic.jms.democonnectionfactory")
    private ConnectionFactory demoMessageFactory;


    public DemoServlet() {
        super();
        // TODO Auto-generated constructor stub
    }


	protected void doGet(HttpServletRequest request, HttpServletResponse response) throws ServletException, IOException {
                // Test sending a message with JMS to a Message Driven Bean
		try {
			sendJMSMessageToDemoQueue("This is a message sent using JMS and a MDB !");
		} catch (JMSException e) {
			e.printStackTrace();
		}
	}


	 private TextMessage createJMSMessageForjmsLoggingMessages(Session session, String messageData) throws JMSException {
	        TextMessage message = session.createTextMessage();
	        message.setText(messageData);
	        return message;
	    }

	    private void sendJMSMessageToDemoQueue(String messageData) throws JMSException {
	        Connection connection = null;
	        Session session = null;
	        try {
	            connection = demoMessageFactory.createConnection();
	            session = connection.createSession(false, Session.AUTO_ACKNOWLEDGE);
	            MessageProducer messageProducer = session.createProducer(demoQueue);
	            messageProducer.send(createJMSMessageForjmsLoggingMessages(session, messageData));
	            String messageClient = "Message sent :" + messageData;
	            System.out.println(messageClient);
	        } finally {
	            if (session != null) {
	                try {
	                    session.close();
	                } catch (JMSException e) {
	                    Logger.getLogger(this.getClass().getName()).log(Level.WARNING, "Cannot close session", e);
	                }
	            }
	            if (connection != null) {
	                connection.close();
	            }
	        }
	    }
}
|