|
|
Page modifiée à 12:41, 15 Oct 2012 par MichelBuffa
JavaEE6 Weblogic exercice 1De $1Table des matières
IntroductionIn this exercice we will write a JavaEE application that uses the new "web profile": a single project that can use JSF/JSP/Servlets/Web Services/EJBs/JPA with some limitations (no message driven beans, no timer, etc.) and one advantage: it is easier to manage as all components are located in a single project, and deployment is done in a single jar file. We will use a javaDB/Derby database for this application. Install the different components
Set Weblogic to deploy "exploded archives"Du to a weblogic 12c bug, project with the "web profile" raise some unexpected errors in the persistence context when the project properties are not set to "deploy as exploded archives" (see ) In the Java EE perspective, locate the server tab, right click on the weblogic server and choose "properties". In the dialog, go to weblogic/publishing and click on "publish as exploded archives".
Creating a "web profile JavaEE 6 project", write a servlet and an EJB for testingAdd a servlet, run the projectCreate a standard dynamic web project using Eclipse, call it for example "Exo1WebProfile". Click twice on the next button and in the last screen, check "Generate web.xml descriptor". Normally we do not need any XML settings in that file (JavaEE 6 replaced the need to XML settings by code annotations) but it will be useful to set the starting URL when we run the project in that file. Add a Servlet in the project, call it TestServlet, and add it in a package named "servlets". Click finish. Add some lines in the doGet() method, like these: protected void doGet(HttpServletRequest request, HttpServletResponse response) throws ServletException, IOException {
Then modify the web.xml file in order to start the project directly with this servlet. If you look at the Servlet code you will find an annotation that set the URL pattern for the servlet: @WebServlet("/TestServlet"), so let's modifiy the <welcome-file> entry in the web.xml descriptor: <welcome-file-list> Then right click the project, do Run As/Run on server. The first time you will be asked to choose a server. Select "weblogic 12c", check the checkbox so that thos will be a default value for this project and click finish. This should launch weblogic, the console tab should appear, etc. And after a while you should see a browser inside Eclipse showing "Welcome to Exo1 test servlet!". Add a stateless session bean EJBNow we will add a stateless session bean EJB to the project. Select as the type of element to add to the project "session bean (EJB 3.x)", add it in a package named "sessions" and name it "HelloWorldBean". Notice that in the wizard you have a select menu for stateless/stateful/singleton and below you may choose to implement some local or remote interfaces. For the moment leave everything with default values (stateless, no interface). Click finish. Add a method to this EJB. The code should look like this: package sessions; Notice the @Stateless and @LocalBean that indicates that we have a stateless session bean that can be only called from the same JVM. Remote session beans are not allowed in a web profile project. Call the session bean from the servletIn order to call the bean from the servlet, we need to add a few lines of code. Inject the EJB reference into the servlet: add these line below the class declaration: @EJB Fix the imports then add these lines in the doGet() method: out.println("The call to the HelloWorld EJB returned: " + bean.helloWorld());
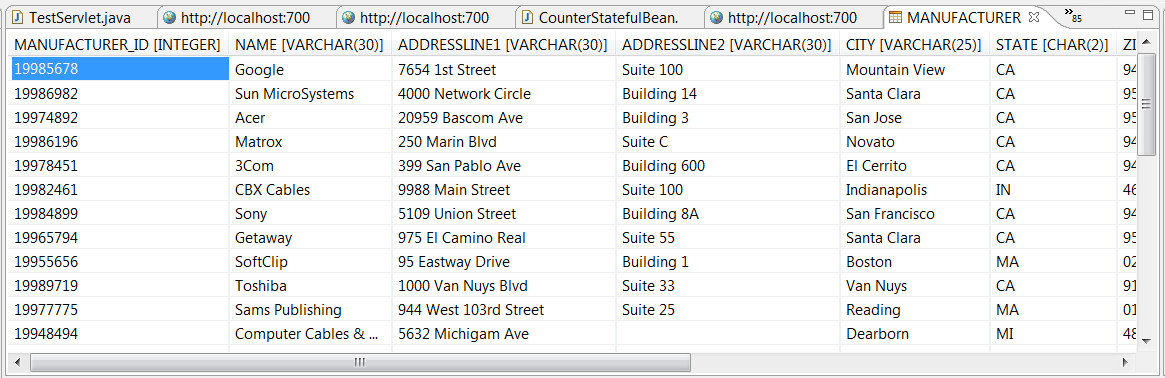
Then run the project. If everything was ok, you should see a message : "The call to the HelloWorld EJB returned: hello world!". The @EJB annotation has injected a reference to an instance of the HelloWorld bean. You do not now if a "new" has been performed or if an existing instance has been used or if there are more than one instance running in the web server. Add JPA to the project, access a javaDB databaseCheck that Derby/JavaDB is running, connect the sample database to Eclipse and to WeblogicNormally you should have installed a Derby/JavaDB database to your system using informations from: Weblogic / Java EE6 FAQ and Guides. Check that you added the database both in Eclipse and in Weblogic. If you followed the instructions in Eclipse, in the java EE perspective, under the "Data Source Explorer" tab you should see the "sample" javaDB database, and be able to consult the data in the different tables:
And the data:
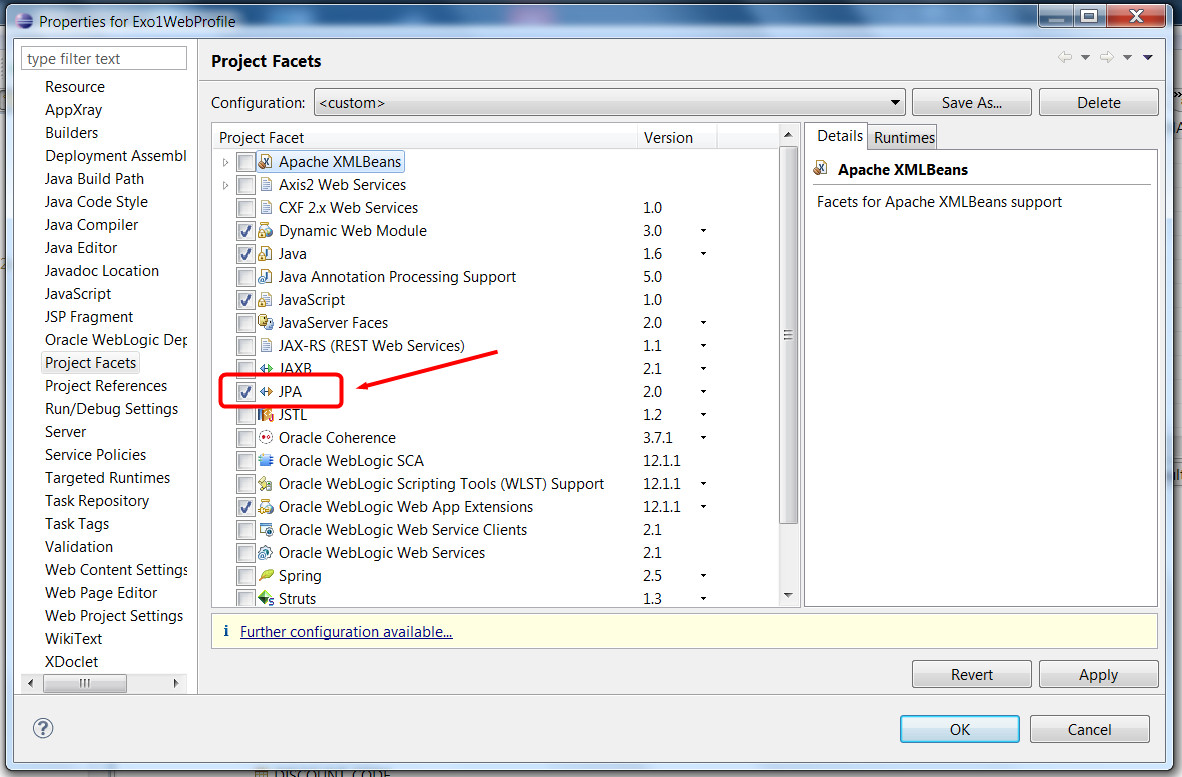
Add JPA facet to the projectEclipse may help you a lot working with JPA but you need to add a JPA facet to the project. Right click on the project then properties/project facets and check the JPA facet. Validate.
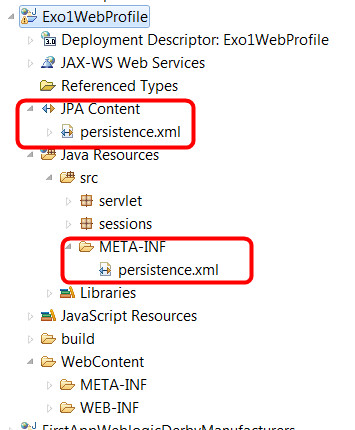
Look at your project, a persistence.xml file has been added under META-INF but there is also a new node in your project called "JPAcContent" that makes persistence.xml easier to access.
This file is used for configuring the different persistence units that you will use in your project. A persistence unit is an object you will use from your code that works with a given database, using an Object Relational Mapping tool like Hibernate, Eclipse Link, Toplink, etc. This file also is useful for specifying if you are allowed to create tables, alter or delete tables, etc. Current persistence.xml file: <?xml version="1.0" encoding="UTF-8"?> As you may see it says that we are going to work woth eclipseLink (provider node...), that we are going to work with a local database (transaction-type), etc... these values are not sufficient for what we want to do. Configure the persistence.xml file using the design toolDouble click on the persistence.xml file, it shoud bring a designer. We are going to configure the database connection, so click on the connection tab at the bottom of the designer. We are using a remote database through a connection pool open on the we logic server. We will just need the JNDI name of the database. Change the Transaction type from "RESOURCE LOCAL" to "JTA" in the wizard, and enter the JNDI name of the sample database as it has been configured in WebLogic. If you followed the instructions from: Weblogic / Java EE6 FAQ and Guides it should be "sample". Ok, you are done with persistence.xml for the moment... Add a JPA entity class mapped to the Manufacturer table of the sample databaseLet's add an entity class generated from the Manufacturer table of the sample database... add a "jpa entity from table" to the project. If asked to what project you want to add the entity, select the current project. Click next. Then you are asked to choose the connection and table. Select the connection you added to Eclipse + select APP as a schema. The table will appear, then check MANUFACTURER Click twice next. Enter "entities" as the package name. On the last screen you may change the name of the class but it is better to leave the proposed name ("Manufacturer") unchanged. Click finished. Look at your project, under the "entities" package you should have a Manufacturer.java file that looks like this: @Entity The @Entity annotation says "I'm mapped to a table whose name of my name capitalized" (in that case, the MANUFACTURER table). The other annotation @Id says that the field is a primary key, and the @Column indicated the name of the column because default rules could not be applied here (defaut = name of the field in upper cases). Write a stateless session bean facade for this entity classUsually, one best practice consists in associating a "facade" with each entity class. A facade is a staless or stafull session bean that will provide CRUD operations on the associated model/entity, as well as convenience functions. Some IDEs like Netbeans or IDEA propose wizards that automate this process. Oracle Enterprise Pack for Eclipse proposes also such a wizard but only for oracle ADF projects ("Application Development Framework"). These are projects that use JSF and some special faces libraries from Oracle. They will not be studied during this training. So let's add a stateless session facade for Manufacturers to this project. Add a new stateless session bean, put it in the "sessions" package, name it ManufacturerFacade. Add in that bean an EntityManager so that we will be able to "talk" to the database and do other interesting things. Just add these two lines as class attributes: @PersistenceContext Add also a method that gets all the existing manufacturers from the table (the JPQL request is equivalent to a SQL select *...). Your session facade should look like that: package sessions;
Notice that executing this request does not return tuples but a Collection of Objects (in our case a List of instances of Manufacturer). Let's the servlet use the session bean facadeIn order to use our new EJB from the Servlet, simply inect it using the @EJB annotation, exactly like we did with the HelloWorldBean. Let's ass this on the Servlet, as well as a call to the getManufacturers() method. We will just display the resulting list by generating some HTML in the response: Here is the new code of the Servlet: package servlet; Run the project, it should display the list of all the manufacturers from the MANUFACTURER table of the sample database. Use a JSP with JSTL and EL to display the resultsIf you followed the training about Java EE Web Components or if you have some skills you should know that it is not a good practice to print HTML code in a servlet. We are going to use a JSP file for viewing the list of manufacturers while the servlet will act as a pure HTTP controller. This is called model 2 architecture (a form of MVC tailored for HTTP applications, see http://en.wikipedia.org/wiki/Model_2) . Servlet is a controller, JSP a view and EJBs are dedicated for business processing and data access. Modify the servlet so that the request if forwarded to a JSP for displaying the dataModify the servlet so that the HTTP request is passed to a JSP for finishing the treatment (generating the view). The trick consists in a adding to the request the data to be displayed before forwarding the request to the JSP: New version of the servlet : protected void doGet(HttpServletRequest request, HttpServletResponse response) throws ServletException, IOException {
Add a JSP page for viewing the data, using JSTL and ELAdd a JSP file in your project, name it "DisplayManufacturers.jsp" and replace the generated content by this one: <%@ page language="java" contentType="text/html; charset=UTF-8" pageEncoding="UTF-8"%> Notice the line: <%@ taglib uri="http://java.sun.com/jsp/jstl/core" prefix ="c" %> That indicates that we are going to use the JSP Standard Tag Library (JSTL), all elements with the namespace c: will use the core part of the JSTL (if, then, else, forEach, etc). In order to display the manufacturers' properties we use the EL expression langage. For example, ${m.name} will call the getName() accessor of the bean Manufacturer.java, if there is no such method, we would get "EL property not found" errors. The line: <c:forEach var="m" items="${manufacturers}">
Defines a loop on a collection named "manufacturers". This collection will be searched in different scopes: the page, the request, the session, the context, etc. As in the servlet we put an attribute named "manufacturers" in the request, it is the one that will be found. More informations about JSTL and EL are available here: Implements the rest of the CRUD operationsWe will now add some methods to the facade in order to be able to create new manufacturers, remove an existing manufacturer or look for a manufacturer... Add several methods to the ManufacturerFacade.java fileIn that example we added some "classic" methodes for a facade. Look at them as we will modify the HTTP part of the application later on (Servlet, JSP) in order to exploit these new functionnalities... package sessions; And modify the Servlet so that it can do several actions depending on HTTP parametersWe modified the Servlet a little so that depending on a HTTP parameter called "action", the servlet can do different operations. In that example we only added "add" and "remove" operations. Look at the code and try to understand the logic of the operations... Copy and paste this code, run the project. package servlet; Then try this URL in your browser: http://localhost:7001/Exo1WebProfile/TestServlet?action=add&id=4&name=Buffa&phone=0662454545&email=buffa@unice.fr This will call the servlet with an action parameter equals to "add", indicating that we want to add a new manufacturer to the database. The rest of the parameters describe the manufacturer we want to add. Normally, this line should add one new Manufacturer and dipslay an updated list. Check using the Data Source Explorer tab that the data has been added in the table. Try also to remove the entry you just inserted: http://localhost:7001/Exo1WebProfile/TestServlet?action=remove&id=4 Here again, check in the database that the entry has really been removed. If you try to remove other manufacturers using their IDs, you may encounter some exceptions as some of the manufacturers primary keys have a relationships to some foreign keys in other tables. Typical error: "Internal Exception: java.sql.SQLIntegrityConstraintViolationException: DELETE sur la table 'MANUFACTURER' a entraîné la violation de la contrainte de clé externe 'FOREIGNKEY_MANUFACTURER_ID' pour la clé (19985678). L'instruction a été annulée. Error Code: -1".. Adapt the JSP so that you can remove, add or search a manufacturerLet's add a form at the beginning of the page, and a link for removing a manufacturer directly in the table. The add and remove and count have been implemented in the servlet but the Search by Name or Remove by name did not have been implemented. You may try this code, then complete the implementation. <%@ page language="java" contentType="text/html; charset=UTF-8" pageEncoding="UTF-8"%> Notice also that we did not use any kind of pagination here, whereas the method findByRange() exists in the facade. You may try to add pagination to your JSP/Servlet too.
|
|
Powered by MindTouch Deki Open Source Edition v.8.08 |