HTML5 tutorial for WWW 2013: study a paint program

De $1

Version de 05:06, 20 Avr 2024

cette version.

Revenir à liste des archives.

Voir la version actuelle


Introduction

In this tutorial, we will take a step by step look at a Paint program written in pure HTML5/JavaScript/CSS, based on the <canvas> element, We will start with a very simple application and build on it, refactor it to make the code easier to understand, and finish with a real paint program. This wrap up is an extract from a tutorial that has been given at the international conference WWW 2012, in which we added multi-participant features using WebSockets.
 
Paint.jpg
 

Recommended tools

  • A recent web browser that supports the <canvas> tag, most do.

Download lab exercises

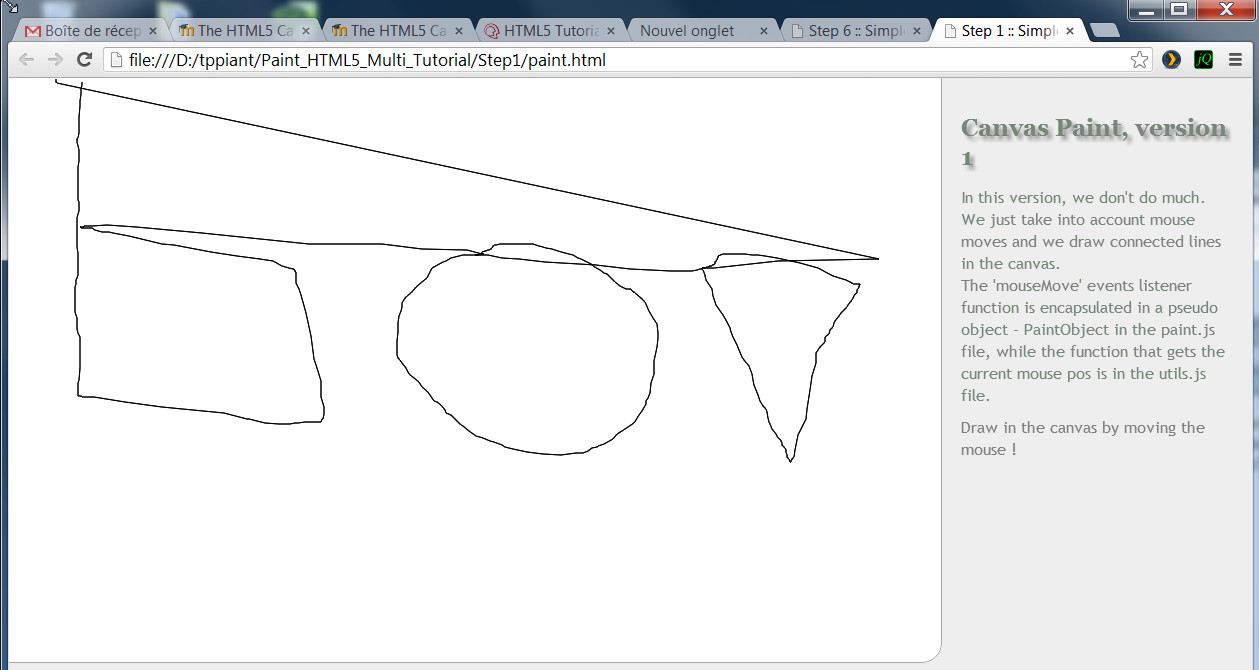
All the source files you will need are included in this zip archive (4Mbytes). Unzip, go in the "Paint_HTML5_Multi_Tutorial". You will find subdirectories step1, step2, etc. corresponding to each step described in this document.

Step 1: a very simple, minimal, paint!

We assume you unzipped the archive from the previous step. Go to the directory where you unzipped the files. You should see a directory named "step 1", open the paint.html file from this directory in your browser.
 
You should see something like this, where every mouse move draws a non interruptible path:
 
PaintStep1.jpg
 
Now, look at the different files. Start with the paint.html file, noticing the first lines:
 
1
2
3
4
5
<!DOCTYPE HTML>
<!-- Note: in HTML5 the DOCTYPE can be memorized by a normal human being -->
<!-- Common mistake: if we put a comment before the doctype element, Internet Explorer will 
not consider the document as a HTML5 document and the canvas tag for example,
will not be displayed! -->


The DOCTYPE is the brand new ultra-simple HTML5 DOCTYPE!

Notice that if you write ANYTHING before this DOCTYPE line, IE9 will not consider the file as HTML5, and you will no be able to run the example! The <canvas> tag in the page will be ignored. Other browsers will however do nothing nasty if you write some comment at the top of the document.

Then, we declare a CSS and some JavaScript scripts. We will use jQuery for most DOM manipulation and event handling. HTML5 proposes the new document.querySelector(...) that behaves closely like jQuery selectors.

1
2
3
4
5
<link rel="stylesheet" href="css/paint.css" />
 
<script src="js/jquery-1.7.2.min.js"></script>
<script src="js/utils.js"></script>
<script src="js/paint.js"></script>


The file paint.js holds most of the code for a small "draw when mouse moves" paint program, while utils.js contains a utility function for getting a correct mouse cursor position, dealing with most of the annoying cases.

When the document is fully loaded and the DOM ready, we create a Paint object, that will hold most of our JavaScript code.

1
2
3
4
5
6
7
<script type="text/javascript">
// Run when the DOM is ready
$(document).ready(function () {
  // Create the pseudo object which will handle the main canvas
  paint = new PaintObject("canvasMain");
});
</script>


The parameter "canvasMain" passed when we constructed the Paint object is the Id of the <canvas> tag you will find in the HTML part of the page :

1
2
3
<canvas id="canvasMain">
    <p>Canvas tag not supported by your browser</p>
</canvas>


Let's have a look at the PaintObject code in the paint.js file. First we get 1) a reference to the canvas element and 2) a context object in order to draw in the canvas:

1
2
3
4
5
function PaintObject(canvas) {
    // get handle of the main canvas, as a DOM object, not as a jQuery Object.
    var mainCanvas = $("#"+canvas).get(0);
    var mainContext = mainCanvas.getContext('2d');
    ...


We also bind a mouse move listener to the canvas:

1
2
// Bind event on the canvas
$("#canvasMain").mousemove(this.mouseMoveListener);


The mouse listener is a method of the PaintObject that draws a line at each mouse move, from the previous mouse position to the current one:

1
2
3
4
5
6
7
8
9
10
11
12
13
14
15
16
17
18
19
20
21
22
// Mouse motion listener for drawing lines
    this.mouseMoveListener = function (event) {
        // we delegate the computation of the mouse position
        // to a utility function (in utils.js) as this is not so trivial
        // we must take into account insets, etc.
        var mousePos = getMousePos(mainCanvas, event);
 
        // Let's draw some lines that follow the mouse pos
        if (!started) {
            previousMousePos = mousePos;
            started = true;
        } else {
            mainContext.beginPath();
            mainContext.moveTo(previousMousePos.x, previousMousePos.y);
            mainContext.lineTo(mousePos.x, mousePos.y);
            mainContext.closePath();
            // draws as wireframe the drawing orders between beginPath() and closePath()
            mainContext.stroke();
 
            previousMousePos = mousePos;
        }
    };

Notice that in order to draw a line we declare a path, we move to a position, we draw a line to another position, we close the path. The path is drawn at the mainContext.stroke() (line 18) call. It will be drawn with the current mainContext.strokeStyle value, which is defaulted to Black.

Be careful: just forget to close the path and at every mouse move you will draw the whole path from the beginning! In fact, mainContext.stroke() draws every draw primitive declared since the context.beginPath() call. If a beginPath() is called while a path is not closed, it is ignored.

Notice the trick we use in order to set the size of the canvas depending on the size of the browser. Instead of using CSS percentages on canvas width and height, resulting in ugly scaling of canvas content, we adjust the size with a piece of JavaScript  code:

1
2
3
4
// Canvas doesn't scale well with '%' in CSS so we use a little trick.
// We give them the size of one of their parent node which can be scalable.
mainCanvas.height = $("#content")[0].clientHeight;
mainCanvas.width = $("#content")[0].clientWidth;

Step 2: manage mouseUp, mouseMove, mouseDown, define a pencil drawing object

Go into the step 2 directory. You may try the example by opening paint.html in your browser.

This time we draw only when the mouse moves with a mouse button pressed.

We also separated the code that draws from the initialization of the PaintObject. The file drawingtools.js will hold "drawing objects" like pencil, line, rectangle, circle, and so on, while paint.js will just do the job of creating contexts, binding events, etc.

We used jQuery to bind different mouse events to the canvas (in paint.js)

1
2
3
4
5
6
7
// Create the drawing tool
var drawingTool = new pencilDrawingTool(); 
 
// Bind events on the canvas
$("#canvasMain").mousedown(drawingTool.mouseDownListener);
$("#canvasMain").mousemove(drawingTool.mouseMoveListener);
$("#canvasMain").mouseup(drawingTool.mouseUpListener);


...and here is the drawingtool.js content with only a tool that draws like a pencil (notice the 3 listener methods for mouseDownmouseMove and mouseUp events):

1
2
3
4
5
6
7
8
9
10
11
12
13
14
15
16
17
18
19
20
21
22
23
24
25
26
27
28
29
30
// Previous position of the mouse
var previousMousePos;
 
// Drawing tool object
function pencilDrawingTool() {
    this.mouseDownListener = function (event) {
        paint.started = true;
        previousMousePos = getMousePos(paint.getFrontCanvas(), event);
    };
 
    this.mouseMoveListener = function (event) {
        // we delegate the computation of the mouse position
        // to a utility function as this is not so trivial
        var mousePos = getMousePos(paint.getMainCanvas(), event);
 
        // Let's draw some lines that follow the mouse pos
        if (paint.started) {
            paint.getMainContext().beginPath();
            paint.getMainContext().moveTo(previousMousePos.x, previousMousePos.y);
            paint.getMainContext().lineTo(mousePos.x, mousePos.y);
            paint.getMainContext().closePath();
            paint.getMainContext().stroke();
        }
        previousMousePos = mousePos;
    };
 
    this.mouseUpListener = function (event) {
        paint.started = false;
    }
};
Modifier la section

Step 3: add a second, transparent canvas on top of the main canvas, for drawing elastic lines

Go into the step 3 directory. You may  try the example by opening paint.html in your browser.

This example shows an interesting use of canvases: they can be layered one on top of another. Using a CSS relative position and the  z-index CSS property with different values, they can act as layers in photoshop. By default they are transparent, and if you use the context.clearRect(x, y, width, height) function you will make a transparent rectangle and be able to "see through" it.

We will use this feature to draw an elastic line (lines that follow the mouse position) on a transparent front canvas, without modifying the main canvas behind.

In order to animate the line when the mouse moves, we clear the front canvas before drawing a line in its new position.

Adding a new canvas on top of the previous one

This is done in paint.js:

1
2
3
4
5
6
7
8
9
10
11
12
13
14
15
16
17
// Prepare a second canvas on top of the previous one, kind of second "layer" 
 var frontCanvas = document.createElement('canvas');
 frontCanvas.id = 'canvasFront';
 
 // Add the temporary canvas as a second child of the mainCanvas parent.
 mainCanvas.parentNode.appendChild(frontCanvas);
 
// Get the context for drawing in the canvas
var frontContext = frontCanvas.getContext('2d');
 
this.getFrontCanvas = function () {
        return frontCanvas;
}
 
this.getFrontContext = function () {
        return frontContext;
}


We added a line drawing tool in drawingtools.js

We declared an array that will hold the different drawing tools (pencil, line, etc):

1
2
3
4
var DEFAULT_TOOL = 'pencil';
...
// Create the drawing tool
var drawingTool = new setOfDrawingTools[DEFAULT_TOOL]();


And the event binding has been modified in order to call the current drawing tool mouse listener method :

1
2
3
4
5
6
7
8
9
10
11
12
13
14
// bind events. We use a function multiplexEvent that will call the proper listeners
// methods of the currentTool.
this.bindMultiplexEvents = function () {
    $("#canvasFront").mousedown(this.multiplexEvents);
    $("#canvasFront").mousemove(this.multiplexEvents);
    $("#canvasFront").mouseup(this.multiplexEvents);
}
 
// if currentTool is pencil, and event.type is mousemove, will
// call pencil.mousemouve(event), if currentTool is line and
// event.type is mouseup, will call line.mouseup(event) etc.
this.multiplexEvents = function (event) {
    drawingTool[event.type](event);
}


...notice that in the line drawing tool (in drawingtools.js) we draw only in the front canvas, and before any draw we clear the front canvas:

1
2
3
4
5
6
7
8
9
10
11
12
13
14
15
16
17
18
19
20
21
22
23
24
25
26
// the Line Drawing Tool Object
setOfDrawingTools.line = function () {
    this.mousedown = function (event) {
        paint.started = true;
        previousMousePos = getMousePos(paint.getFrontCanvas(), event);
    };
 
    this.mousemove = function (event) {
        var mousePos = getMousePos(paint.getFrontCanvas(), event);
        if (paint.started) {
            // Clear front canvas before drawing the elastic line in a new position
            paint.getFrontContext().clearRect(0, 0, paint.getFrontCanvas().width, 
                                                    paint.getFrontCanvas().height);
 
            paint.getFrontContext().beginPath();
            paint.getFrontContext().moveTo(previousMousePos.x, previousMousePos.y);
            paint.getFrontContext().lineTo(mousePos.x, mousePos.y);
            paint.getFrontContext().stroke();
            paint.getFrontContext().closePath();
        }
    };
 
    this.mouseup = function (event) {
        paint.started = false;
    }
};


 In the paint.html file, we added some spans in order to select the current tool:

1
2
3
4
5
<div id="drawCommands">
    <h6>Pick a tool</h6>
    <span id="line">line</span>
    <span id="pencil">pencil</span>
</div>

And in paint.js we detect clicks on them:

1
2
3
4
5
6
7
8
9
// Handle the drawing tools menu. The selected entry value can be 'Pencil',
// 'Line' etc.
this.changeDrawingTool = function () {
    // this.id is the id of the selected menu item
    drawingTool = new setOfDrawingTools[this.id]();
}
 
// Bind the changeDrawingTool function onClick to every menu items.
$("#drawCommands").find("span").click(this.changeDrawingTool);


Small problem : how can we make the line stay on the drawing when we draw another line ?


Step 4: draw the front canvas on the main canvas on mouse release, when drawing lines

Go into the step 4 directory. You may try the example by opening paint.html in your browser.

This time when we release the mouse button the line is drawn and will stay in the main drawing, even if we draw other elastic lines.

Question: how to fix the previous version where lines "did not remain" when we released the mouse button ?

Answer: we just draw the front canvas on the the main canvas on mouseUp events !

In paint.js we added a drawFrontCanvasOnMainCanvas() method on the PaintObject:

1
2
3
4
5
this.drawFrontCanvasOnMainCanvas = function () {
    mainContext.drawImage(frontCanvas, 0, 0);
    // after copying the front canvas content, we clear it !
    frontContext.clearRect(0, 0, frontCanvas.width, frontCanvas.height);
}

Notice that we use a drawImage() call from a canvas context object. Indeed, we can draw a canvas on a canvas!

And we call this method from the mouseUp() listener method of the line drawing tool:

1
2
3
4
5
6
7
8
// The Line Drawing Tool Object
setOfDrawingTools.line = function () {
    ...
    this.mouseup = function (event) {
        paint.started = false;
        paint.drawFrontCanvasOnMainCanvas();
    }
};
 

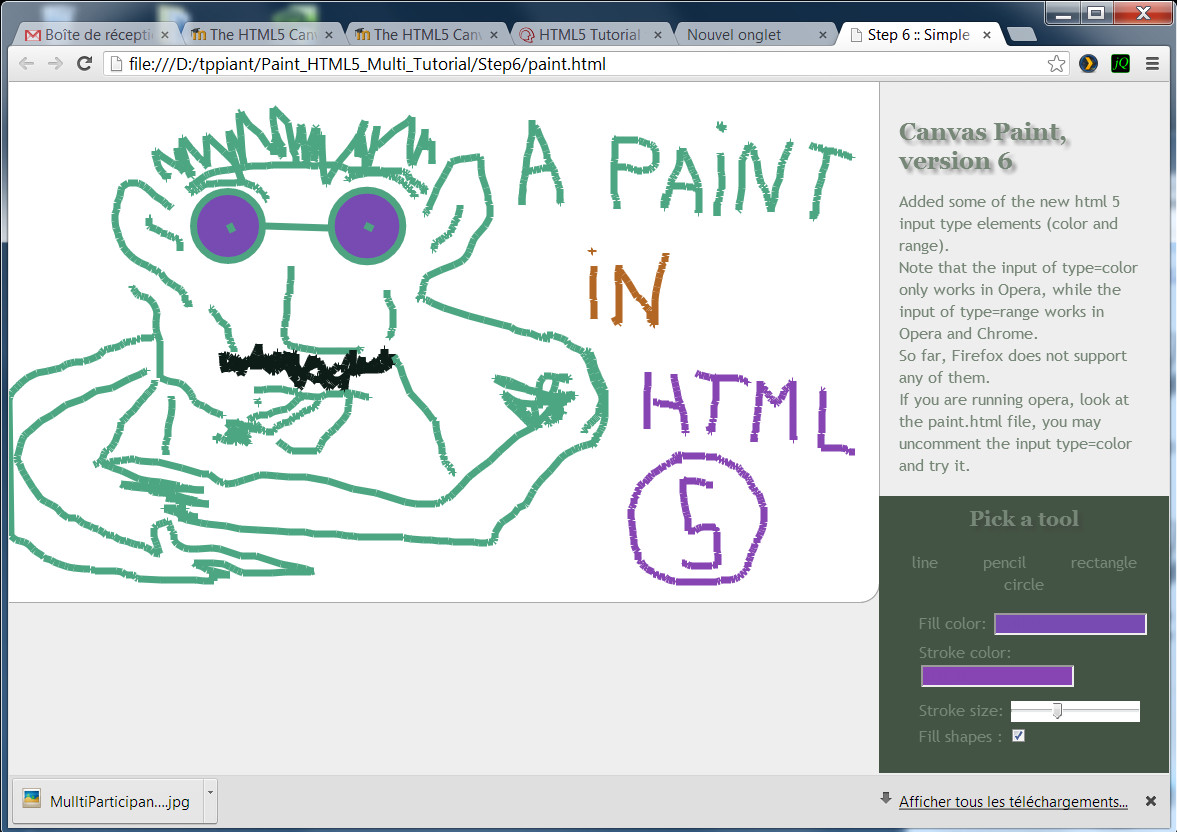
Step 5: adding a rectangle and a Circle tool

Go into the step 5 directory. You may try the example by opening paint.html in your browser.

This time, the same way we did the line tool, we added two new tools: one for drawing elastic rectangles and one for drawing elastic circles.

You may look at these tools in drawingtools.js.

Now that we have a small framework, you can try to add your own tools for drawing ellipses, images etc. (NOTE: this is part of the assignment for this chapter)

Step 6: playing with stroke and fill styles, lineWidth, HTML5 new input types (color, range)

Go into the step 6 directory. You may try the example by opening paint.html in your browser.

This time we added new HTML5 input types in the graphic user interface:

1
2
3
4
5
6
7
8
9
10
11
12
13
14
15
16
17
18
19
20
21
<ul>
  <li>Fill color:
      <!-- if running opera you may try : <input id="fillColor" type="color" 
           value="FFFFFF" /> instead of this jscolor input field -->
      <input id="fillColor" class="color" value="FFFFFF" />
   </li>
   <li>Stroke color:
       <!--  if running opera you may try :<input id="strokeColor" type="color" 
             value="FFFFFF" /> -->
       <input id="strokeColor" class="color" value="000000" />
   </li>
   <li>
       <!-- works only in Chrome and Opera, will display a standard input text in Firefox -->
        Stroke size: <input id="strokeSize" type="range" 
                            min="0" max="20" value="1" step="0.5" 
                            style="position:relative;top:6px;" />
   </li>
   <li>
       Fill shapes : <input id="fillShapes" type="checkbox" checked />
   </li>
</ul>


We used a <input type="range".../> for selecting the line width. This will work in Opera, Webkit based browser. It is not yet supported by Firefox, but will work nevertheless if you enter a numeric value.

For color selection we used a "polyfill", a <input class="color" /> that works with the jscolor.js library. If you are running a browser that supports  the HTML5 <input type="color"/> then change the code to display a nice color chooser natively.

In paint.js we handle the values of these fields in order to keep the contexts for both canvases (mainCanvas and frontCanvas) up to date:

1
2
3
4
5
6
7
8
9
10
11
12
13
14
15
16
17
18
19
20
21
22
23
// Handle the color menus
    mainContext.strokeStyle = frontContext.strokeStyle = "#" + $("#strokeColor").val();
    $("#strokeColor").change(function() {
        mainContext.strokeStyle = frontContext.strokeStyle = "#" + $("#strokeColor").val();
    });
 
    mainContext.fillStyle = frontContext.fillStyle = "#" + $("#fillColor").val();
    $("#fillColor").change(function() {
        mainContext.fillStyle = frontContext.fillStyle = "#" + $("#fillColor").val();
    });
 
    // handle the stroke size
    mainContext.lineWidth = frontContext.lineWidth = $("#strokeSize").val();
    $("#strokeSize").change(function() {
        mainContext.lineWidth = frontContext.lineWidth = $("#strokeSize").val();
    });
 
    var fillShapes = true;
    // handle the check box that specifies if we fill shapes
    //this.fillShapes = $("#fillShapes").attr('checked');
    $("#fillShapes").change(function(){
        fillShapes = $(this).attr("checked");
    });


This way, all the calls to stroke() or fill() using any of the contexts will draw a shape using the selected corresponding color.