Introduction
This la exercice/tutorial shows an application that uses different Java EE frameworks. It shows the use of the MVC framework JSF 2, the use of Enterprise Java Beans, in particular as session facades or singleton objects, the use of JPA and entity classes as models shared all along the different layers of the application.
Application architecture:
Logiciels utilisés
This tutorial uses Netbeans 7.2 enterprise.
Creation of a project of type "Enterprise Application"
This is a special kind of project made of different modules : EJB modules, web modules, etc. All these sub-projects are grouped in a single project of type enterprise, that acts as a single container. The Java EE project is in a .ear file, (ear meas Enterprise ARchive) and makes the deployement easier.
Use Netbeans menu File/New Project choose "Java EE" as a category, and choose the type of project as "Enterprise Application".

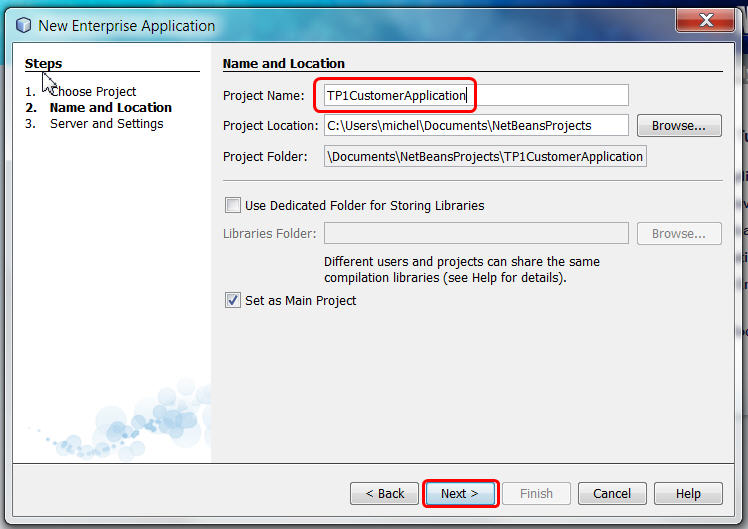
Click "Next" then give a name to the project. Do not use strange characters in the project name please !
In the screenshots, we chose TP1CustomerApplication for the project name.
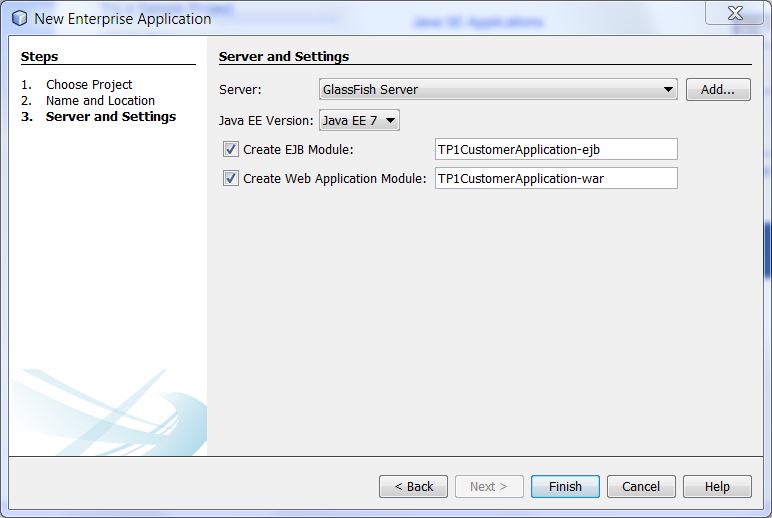
In the next dialog, you will choose the application server, the Java EE version, etc. Keep all the default values. Do not forget to click the "Enable Context and Dependency Injection" checkbox ! Otherwise JSF will not work !
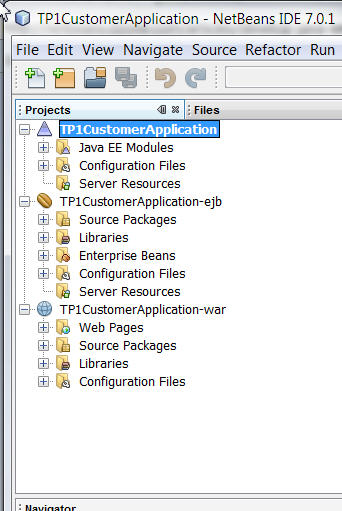
Click on finish now. Normally you will see 3 projects added to Netbeans:
- One project with a blue triangle: the one that is the container for the two others. It's the .ear project.
- A project with an icon in form of a java bean, the one that will hold the business part of the application, in our case EJBs and entity classes. All are "Java beans": classes with a default constructor, properties, etc.
- a project with a world shaped icon, this is the "web" project that will hold the HTTP part of the application. In our case the JSF beans, the JSF pages, the CSS files,
Create an entity class from an existing database
Java EE contains a framework named JPA for Java Persistence API. In that framework, special classes called "entity classes" correspond to tables in databases. The mapping between these classes and tables is done using external ORM tools like Hibernate or EclipseLink. These tools provides some means for generating automatically entity classes from the table models. This is what we are going to use.
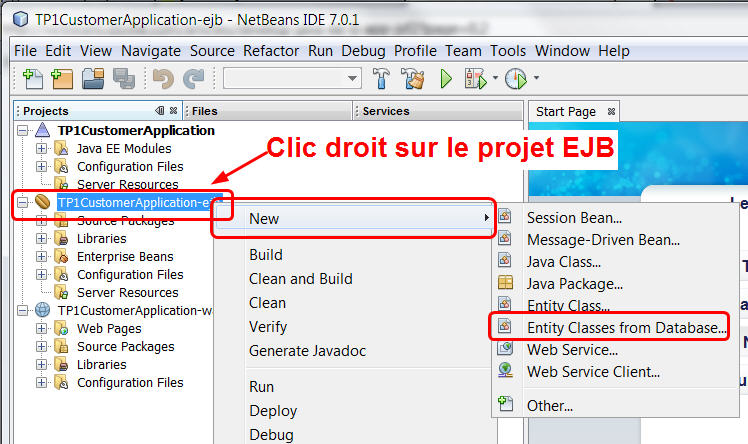
In the EJB project, the one with a java bean icon, do a right clic on the project name, and choose New/Entity class from database:
You will be asked the JNDI name of the database. Choose "jdbc/sample". It's a database that comes bundled with the JavaDB database included in glassfish 3. So, no need to run a database server, create by hand some database, tables, etc.
Normally after you chosed the name of the database, the left list will appear showing the available tables:
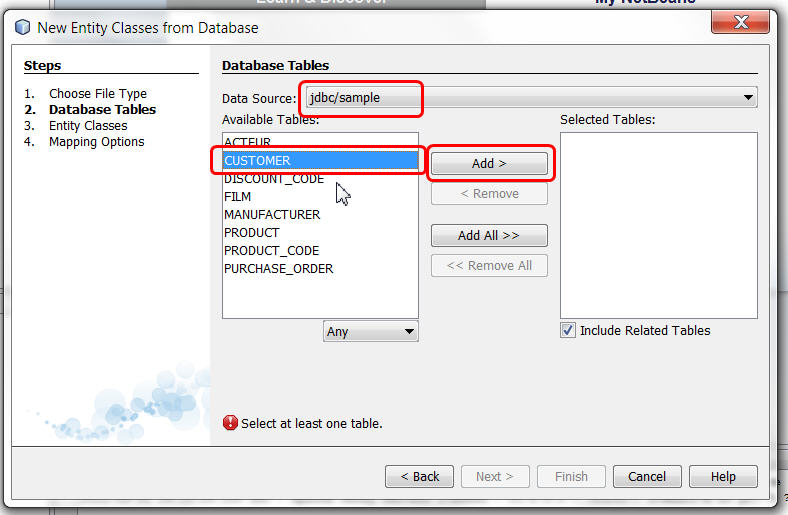
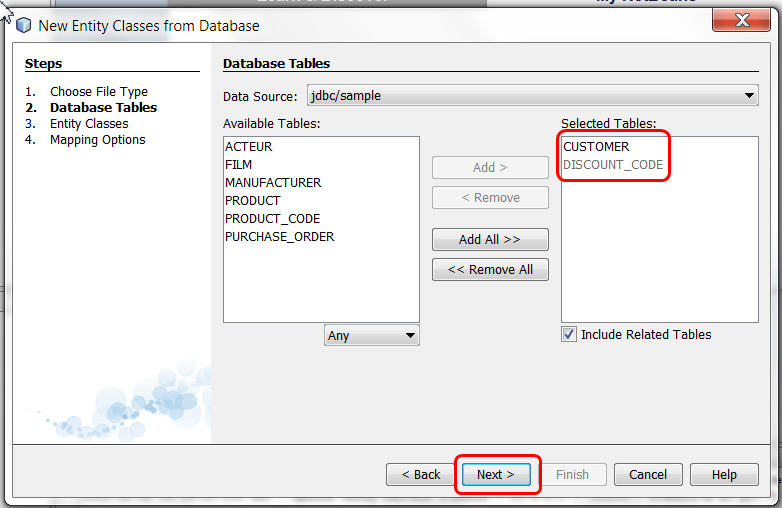
Choose "CUSTOMER"and click the "add" button, this will add in fact two tables: CUSTOMER and also DISCOUNT_CODE as there is a relation between these two tables:
Click "Next". Now you may change the names of the Java entity classes that will be generated. I recommend to let all the default values. One good practice is to put them in a package named "entities", like shown in this screenshot:
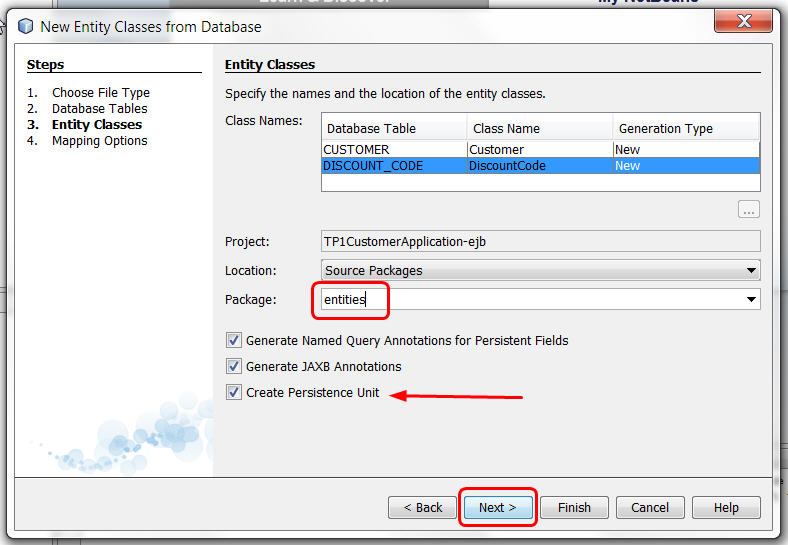
Click "Next".Leave all default values...
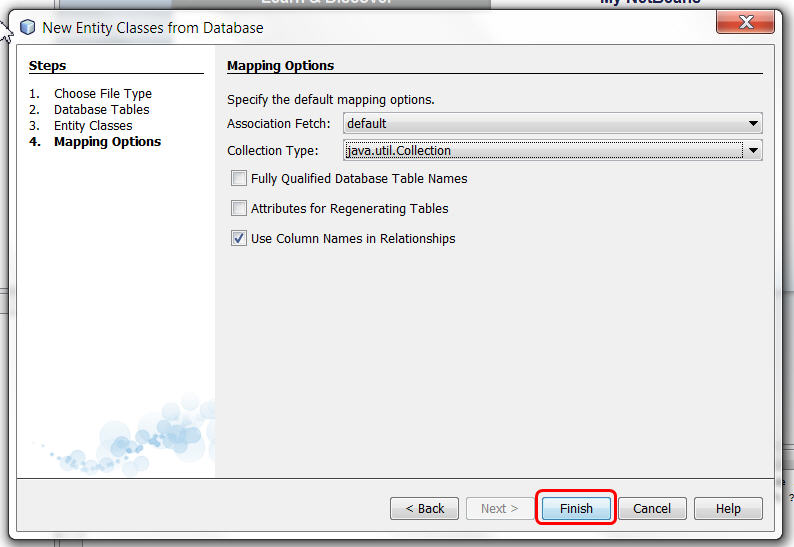
- Click finish. This will generate two java classes in a new package called "entities". Look at them now !
- Also, a file named persistence.xml under"configuration" appeared, that corresponds to the persistence unit of the project. The persistence unit is responsible of all the database operations. It's this object that under the hood will generate all the SQL code.
Double click persistence.xml, you will see a designer that looks like that:
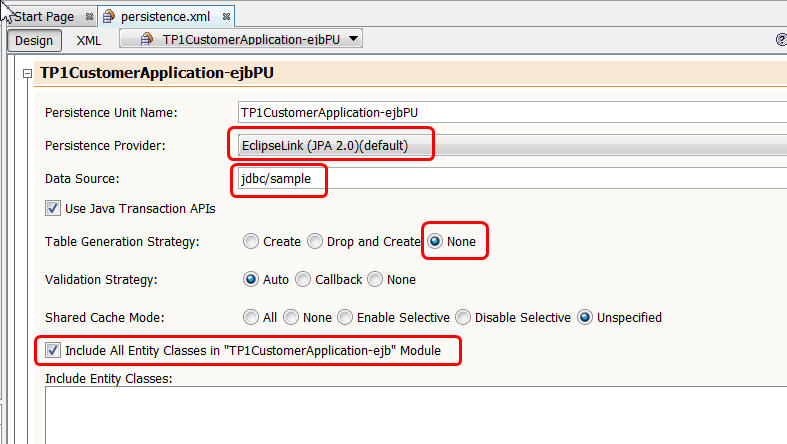
Without entering into details, we recognize that
- We do not authorize the application to create new tables (None)
- We will use transactions when accessing/modifying data in the database,
- This persistence unit works with the database jdbc/sample, use Eclipse Link and will map all entity classes available in the project to jdbc/sample tables.
Creation of a Customer facade
We will now add to the project a DAO / Facade that will take charge of all CRUD operations on the Customer entities. If one wants to insert, update, remove, search entities in the database jdbc/sample, he will have to use this facade !
We will implement this facade as a stateless session bean EJB:
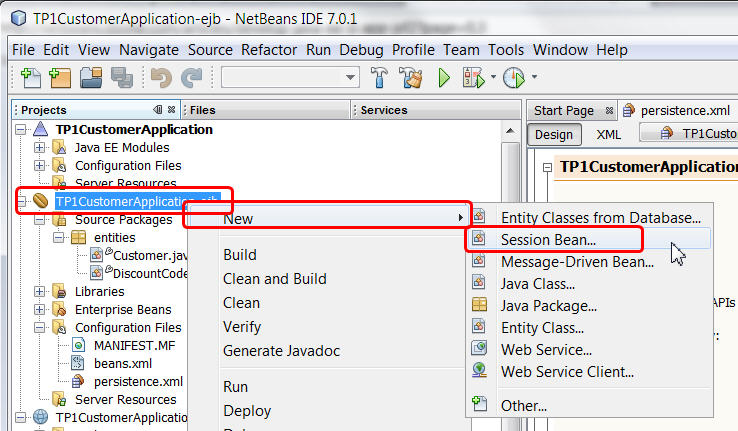
Do a right click New/Session Bean on the EJB project:
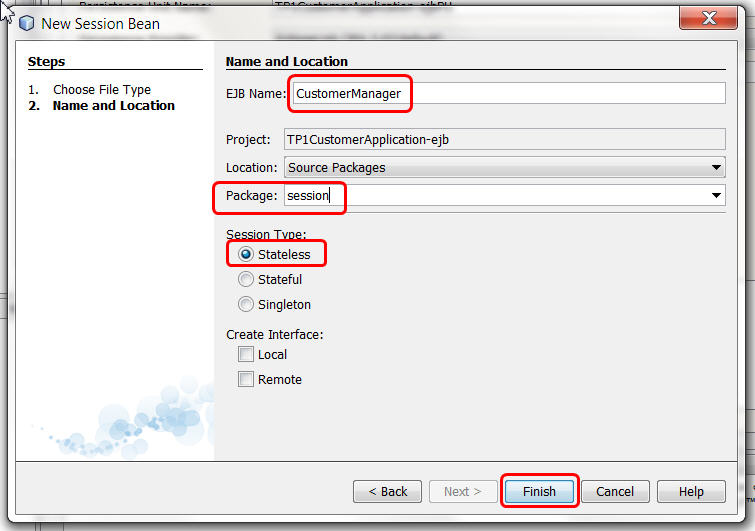
Give a name to your facade. In general we would call it CustomerFacade or CustomerDAO or CustomerManager or CustomerHandler, and we will put it in a package named "sessions" in order to differentiate it
Add some business methods in the facade
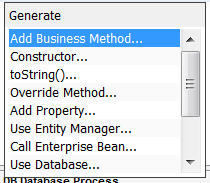
Double click "CustomerManager.java" in the project so that the source code is shown in the editor. Click somewhere in the class (after the { for example) and right click / insert code. This will show a very interesting menu...
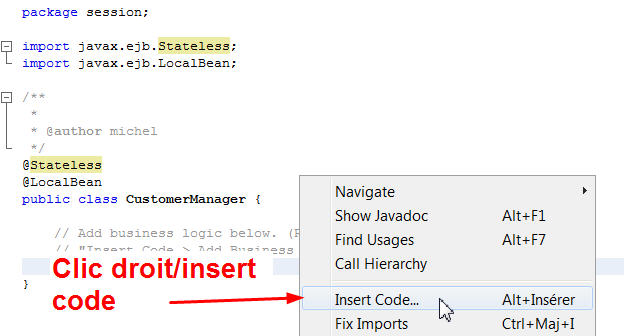
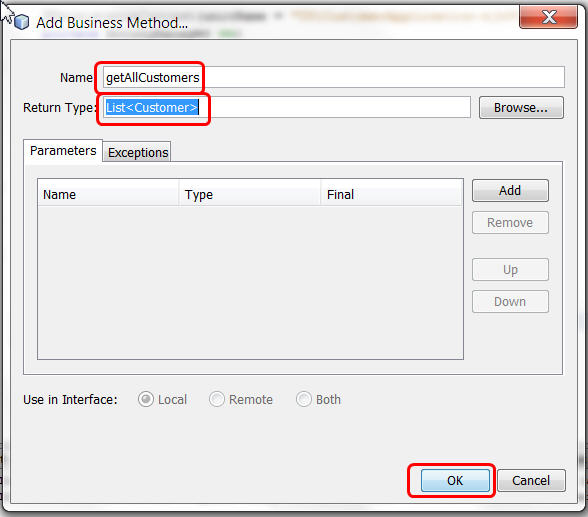
Choose "add business méthod" and add a method named getAllCustomers() that will return a List of Customers:
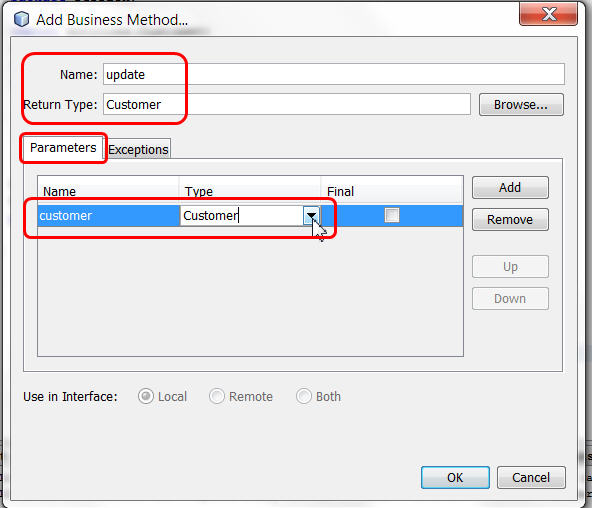
In the source, add the imports that are missing (click on the small yellow icon, or right click/fix imports, or Alt-Shift-I, or ⌘-Shift-I if you have a Mac). Add also a method update(Customer c) {...} that will be useful for updating a customer.
You should get a code that looks like that:
- package session;
-
- import entities.Customer;
- import java.util.Collection;
- import javax.ejb.Stateless;
- import javax.ejb.LocalBean;
-
- @Stateless
- @LocalBean
- public class CustomerManager {
-
- public List<Customer> getAllCustomers() {
- return null;
- }
-
- public Customer update(Customer customer) {
- return null;
- }
-
- }
package session;

import entities.Customer;
import java.util.Collection;
import javax.ejb.Stateless;
import javax.ejb.LocalBean;

@Stateless
@LocalBean
public class CustomerManager {

    public List<Customer> getAllCustomers() {
        return null;
    }

    public Customer update(Customer customer) {
        return null;
    }

}
Of course you could have typed these methods by hand, it was just cool to show you some netbeans goodies...
Now we will implement these methods. Explanation are in the full JPA course but for now, just follow the instructions.
- We will add a "PersistenceContext" to the application, using an annotation that will inject a variable of type EntityManager. This variable corresponds to the persistence unit defined in the persistence.xml file. We will use this variable for inserting/updating/deleting of send queries to the database. Just right click / insert code / add entity manager
- @PersistenceContext(unitName = "TP1CustomerApplication-ejbPU")
- private EntityManager em;
- public void persist(Object object) {
- em.persist(object);
- }
@PersistenceContext(unitName = "TP1CustomerApplication-ejbPU") // the name can be different in your case
 private EntityManager em;
 public void persist(Object object) {
    em.persist(object);
 }
The variable em does not need to be initialized, as it will be "injected". The name just after the "unitName=" parameter, in the example "TP1CustomerManager-ejbPU", is also in the persistence.xml file. ,
New version of the methods:
- package session;
-
- import entities.Customer;
- import java.util.Collection;
- import javax.ejb.Stateless;
- import javax.ejb.LocalBean;
- import javax.persistence.EntityManager;
- import javax.persistence.PersistenceContext;
-
- @Stateless
- @LocalBean
- public class CustomerManager {
-
- @PersistenceContext
- private EntityManager em;
-
- public List<Customer> getAllCustomers() {
- Query query = em.createNamedQuery("Customer.findAll");
- return query.getResultList();
- }
-
- public Customer update(Customer customer) {
- return em.merge(customer);
- }
-
- public void persist(Object object) {
- em.persist(object);
- }
- }
package session;

import entities.Customer;
import java.util.Collection;
import javax.ejb.Stateless;
import javax.ejb.LocalBean;
import javax.persistence.EntityManager;
import javax.persistence.PersistenceContext;

@Stateless
@LocalBean
public class CustomerManager {

    @PersistenceContext
    private EntityManager em;

    public List<Customer> getAllCustomers() {
        Query query = em.createNamedQuery("Customer.findAll");
        return query.getResultList();
    }

    public Customer update(Customer customer) {
        return em.merge(customer);
    }

    public void persist(Object object) {
        em.persist(object);
    }
}
Here we are, we implemented these two methods. The first one executes a "named query" whose name is "Customer.findall". Look at the beginning of the file Customer.java, you will find this query. It's equivalent to a select * from CUSTOMER. But as we are working with objects, in that case we will return a List of Customers, not tuples.
The second method, update(Customer customer)... updates the database content with the value of the Customer passed as a parameter. The em.merge(customer); call does exactly that: "take this object in memory, look if it exists in the database, then update the columns in the database if they do not correspond to the customer object property values. Objects have a primary key (in that case, look at the id property in the Customer.java class).
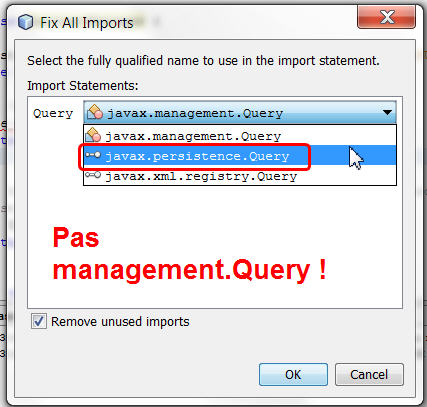
Normally you should fix the imports, but beware at the Query class, you must import it from the javax.persistence package, not from the javax.management package !
Ok, we are fone with the business part of the project.
Then we will look at the web part.
Creation of the web part
In this part of the tutorial, we will use the JSF 2 MVC framework
Add JSF 2 to the web project
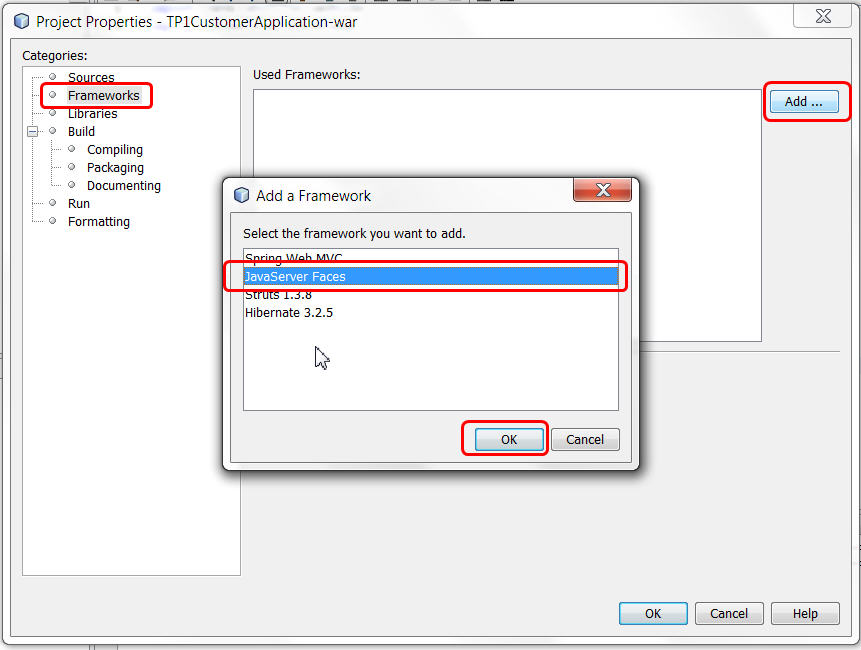
Right click on the web project / properties and click on framework. Add Java Server Faces:
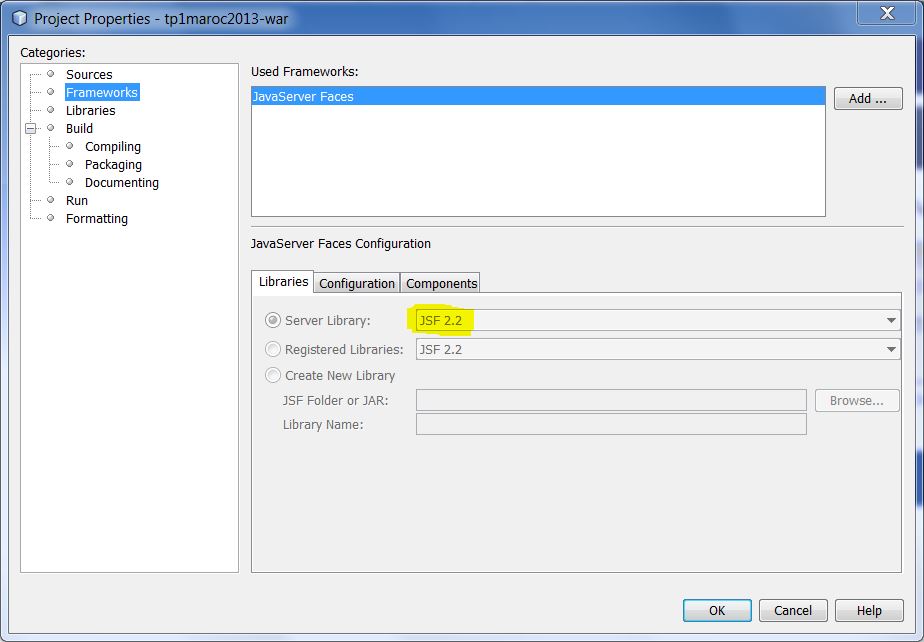
Check that you are using JSF 2:
Create a JSF managed bean as a controll
Right click on the project and add/java server faces / jsf managed bean
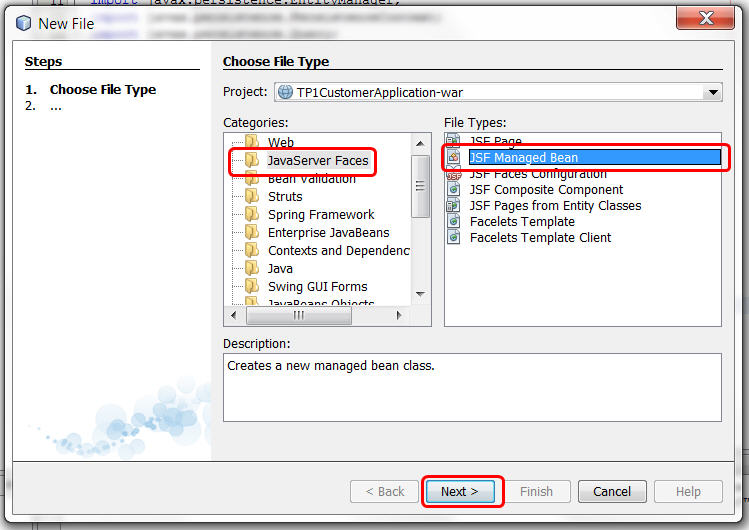
Give a name to this JSF bean. As it will manage the GUI for Customers, we call it CustomerMBean and add it to a package named managedbeans.
We choose that its lifetime will be the HTTP session, so we set its scope to be "session".
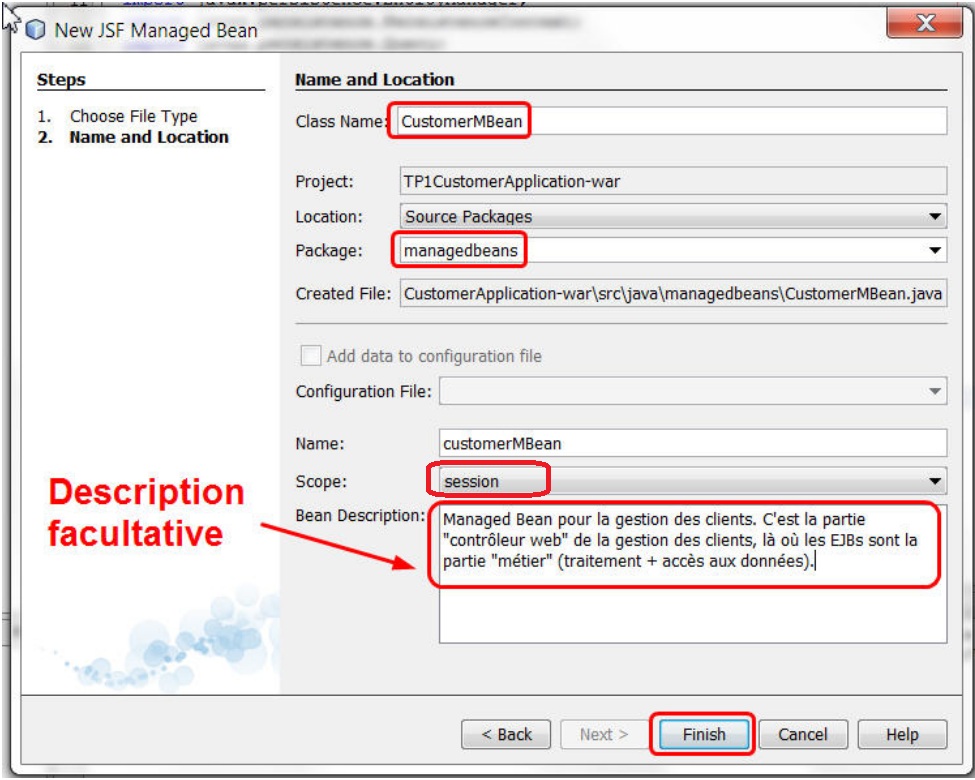
You should get a CustomerMBean.java that looks like that:
- package managedbeans;
-
- import javax.inject.Named;
- import javax.enterprise.context.SessionScoped;
- import java.io.Serializable;
-
- @Named(value = "customerMBean")
- @SessionScoped
- public class CustomerMBean implements Serializable {
-
- public CustomerMBean() {
- }
- }
package managedbeans;

import javax.inject.Named;
import javax.enterprise.context.SessionScoped;
import java.io.Serializable;

@Named(value = "customerMBean")
@SessionScoped
public class CustomerMBean implements Serializable {

    public CustomerMBean() {
    }
}
Note the annotation @SessionScoped. This annotation says that 1) the bean will last the duration of the http session and 2) its attributes/properties will be stored in the HTTP session. We will use the properties of this class as Models for display/modification in the JSF page (they are views in our approach).
Now we will add some functionalities to this JSF bean:
- Make it ready to use the Customer Facade we wrote in the EJB project,
- Add an attribute/property of type Customer, that will be a model used when we will edit or insert a customer in a form in a JSF page,
- Add a list of customers that will be a model for displaying this list in a table,
- Add some controller methods that will be called from the JSF pages.
To call an EJB, right click / insert code / call enterprise bean. This will just add these two lines:
- @EJB
- private CustomerManager customerManager;
@EJB
  private CustomerManager customerManager;
Here again, the @EJB annotation injects the customerManager variable. No need for a new()... This annotation acts both as a service locator and as a factory. But this time, control is reversed, (we call it "inversion of control" or IOC: the right object is built by a "third person", in this case, the EJB container).
Let's complete the JSF bean code:
- package managedbeans;
-
- import entities.Customer;
- import javax.ejb.EJB;
- import javax.inject.Named;
- import javax.enterprise.context.SessionScoped;
- import java.io.Serializable;
- import java.util.List;
- import session.CustomerManager;
-
- @Named(value = "customerMBean")
- @SessionScoped
- public class CustomerMBean implements Serializable {
-
- @EJB
- private CustomerManager customerManager;
-
- private Customer customer;
- private List<Customer> customers;
-
- public CustomerMBean() {
- }
-
-
-
-
-
- public List<Customer>getCustomers() {
- if((customers == null) || (customers.isEmpty())) refresh();
- return customers;
- }
-
- public void refresh() {
- tousLesComptes = compteBancaireFacade.findAll();
- }
-
-
-
-
-
- public Customer getDetails() {
- return customer;
- }
-
-
-
-
-
-
- public String showDetails(Customer customer) {
- this.customer = customer;
- return "CustomerDetails";
- }
-
-
-
-
-
-
- public String update() {
- System.out.println("###UPDATE###");
- customer = customerManager.update(customer);
- return "CustomerList";
- }
-
-
-
-
- public String list() {
- System.out.println("###LIST###");
- return "CustomerList";
- }
- }
package managedbeans;

import entities.Customer;
import javax.ejb.EJB;
import javax.inject.Named;
import javax.enterprise.context.SessionScoped;
import java.io.Serializable;
import java.util.List;
import session.CustomerManager;

@Named(value = "customerMBean")
@SessionScoped
public class CustomerMBean implements Serializable {

    @EJB
    private CustomerManager customerManager;
    /* models/properties */
    private Customer customer; // for display/update/insert in a form
    private List<Customer> customers; // for display in a datatable

    public CustomerMBean() {
    }

    /**
     * returns customer list for display in a datatable DataTable
     * @return
     */
    public List<Customer>getCustomers() {
        if((customers == null) || (customers.isEmpty()))            refresh();
        return customers;
    }

    public void refresh() {
        tousLesComptes = compteBancaireFacade.findAll();
    }

    /**
     * returns details of a customer. Useful for displaying in a form a customer's details
     * @return
     */
    public Customer getDetails() {
        return customer;
    }

    /**
     * Action handler - Called when a line in the table is clicked
     * @param customer
     * @return
     */
    public String showDetails(Customer customer) {
        this.customer = customer;
        return "CustomerDetails"; // will display CustomerDetails.xml JSF page
    }

    /**
     * Action handler - update the customer model in the database.
     * called when one press the update button in the form
     * @return
     */
    public String update() {
        System.out.println("###UPDATE###");
        customer = customerManager.update(customer);
        return "CustomerList"; // will display the customer list in a table
    }

    /**
     * Action handler - returns to the list of customers in the table
     */
    public String list() {
        System.out.println("###LIST###");
        return "CustomerList";
    }
}
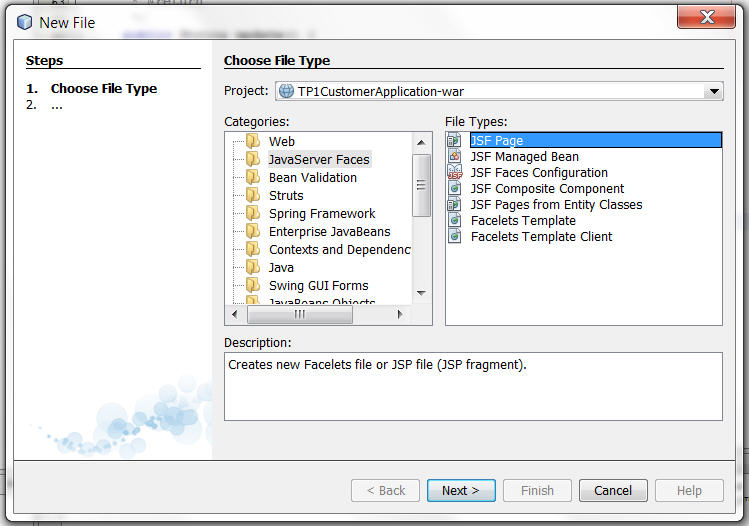
Add a JSF page for displaying customers in a table
Let's add a JSF page to the project. Right click / new Java Server Faces / JSF page:
Click "next", then give a name to the JSF page:
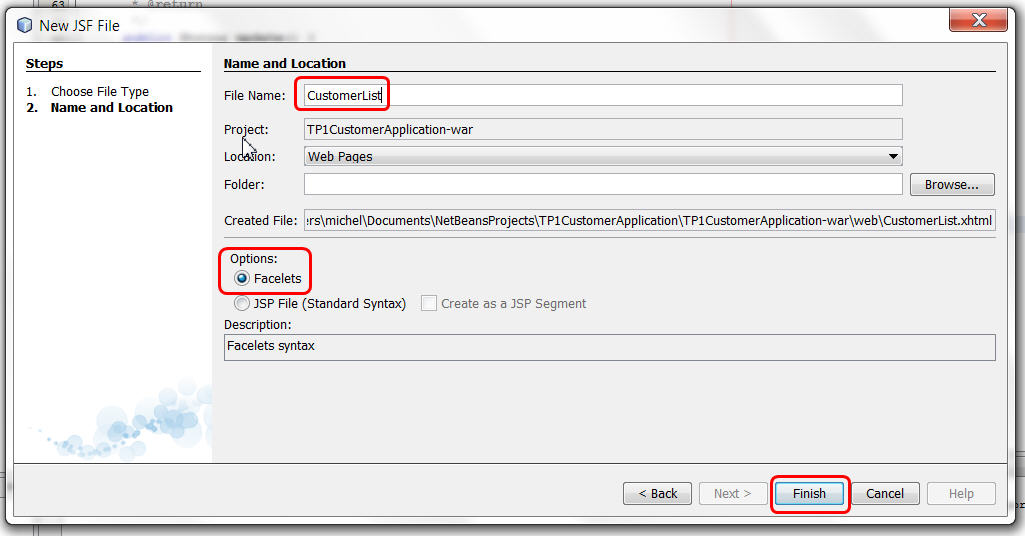
This will add a CustomerList.xhtml file in the project. Double click to see the source. You may add some text or html code there...
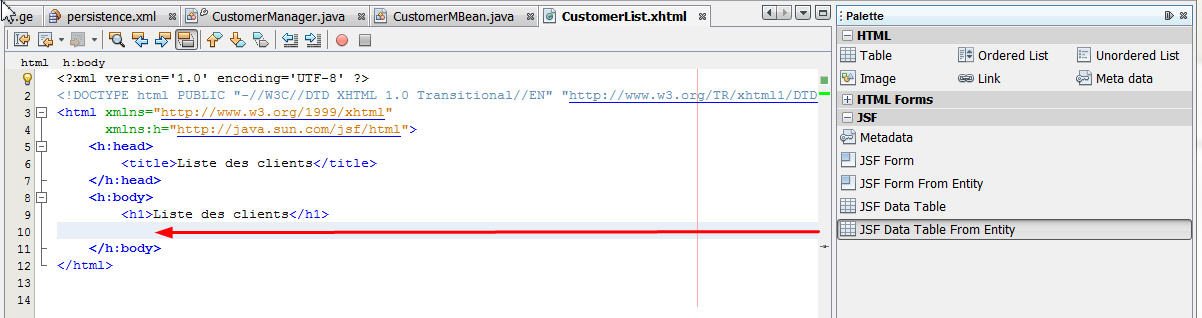
Add a datatable JSF widget in the JSF page, link it to the "customers" model
Shaw the palette tool in netbeans (menu Window/Palette or shortcut ctrl-shift-8). Open the JSF part and drag'n'drop "JSF Data Table from Entity", just after the body:
A dialog appears asking for which entity class you want a datatable. Enter Customer as the entity, and select customerMBean.customers as the name of the property in the JSF bean that corresponds to this entity in the JSF bean. A property is define by its getters and setters. As we have getCustomers() that returns a List of Customers, in our JSF bean, this is ok.
So, a model of type "Customer" or List<Customer> in the JSF bean, is a property as soon as there is a getCustomer() or getCustomers() accessor methods. We can associate these models to some view components like a datatable (for the getCustomers() method that returns a collection) or to a form widget (for the GetCustomer() or getDetails() methods that return a single customer).
- @Named(value = "customerMBean")
- @SessionScoped
- public class CustomerMBean implements Serializable {
- ...
- public Collection getCustomers() {
- ....
- }
@Named(value = "customerMBean")
@SessionScoped
public class CustomerMBean implements Serializable {
...
public Collection getCustomers() {
    ....
}
So here is the dialog with the correct values:
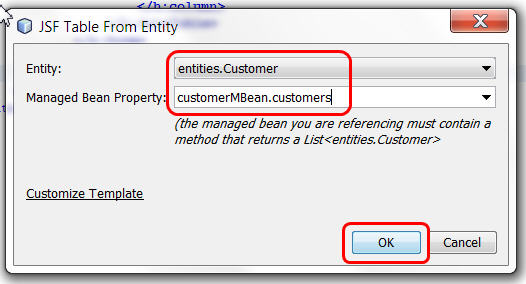
Click Ok. This will add many lines in the JSF page. Maybe you will need to add the "xmlns:f="http://java.sun.com/jsf/core" namespace to the <html> element, you may also use ctrl-espace for auto-completing the name.
Test your project
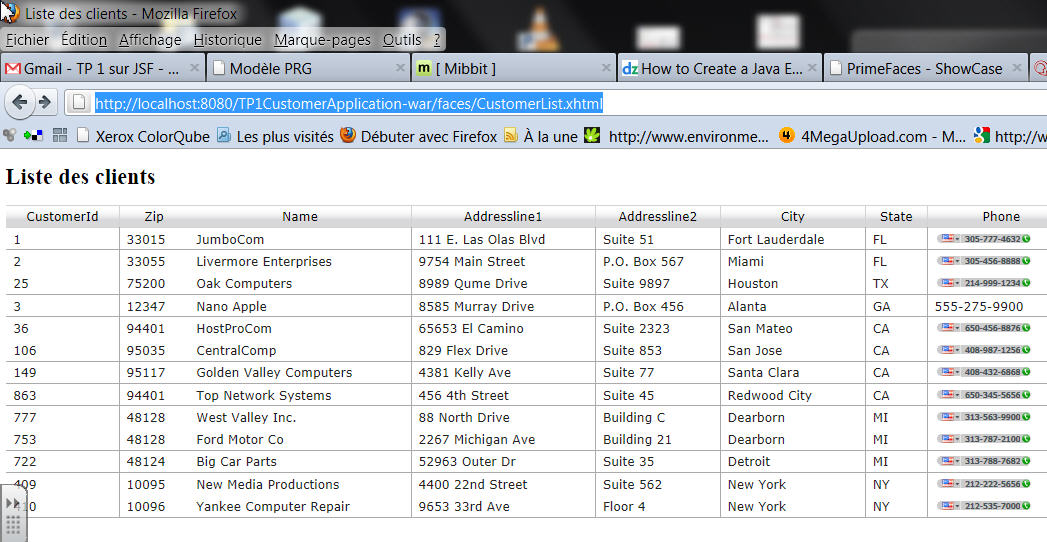
Right click on the EAR project, the one with a blue triangle icon, and choose "Run". This should dosplay the "index.jsp" page by default. Change the URL so that it shows "http://localhost:8080/TP1CustomerApp...omerList.xhtml"
You may also change the default home page of your project by editing the WEB-INF/web.xml file...
You should get the following result:
.jpg)
So far this table is not very nice. Do not worry...
Data come from a database named jdbc/sample.
You can explore it using the service tab of netbeans. It proposes a small but powerful database manager. Open the database icon, then look for the sample database and do right click/connect, look at the CUSTOMER table, and right click / view data.
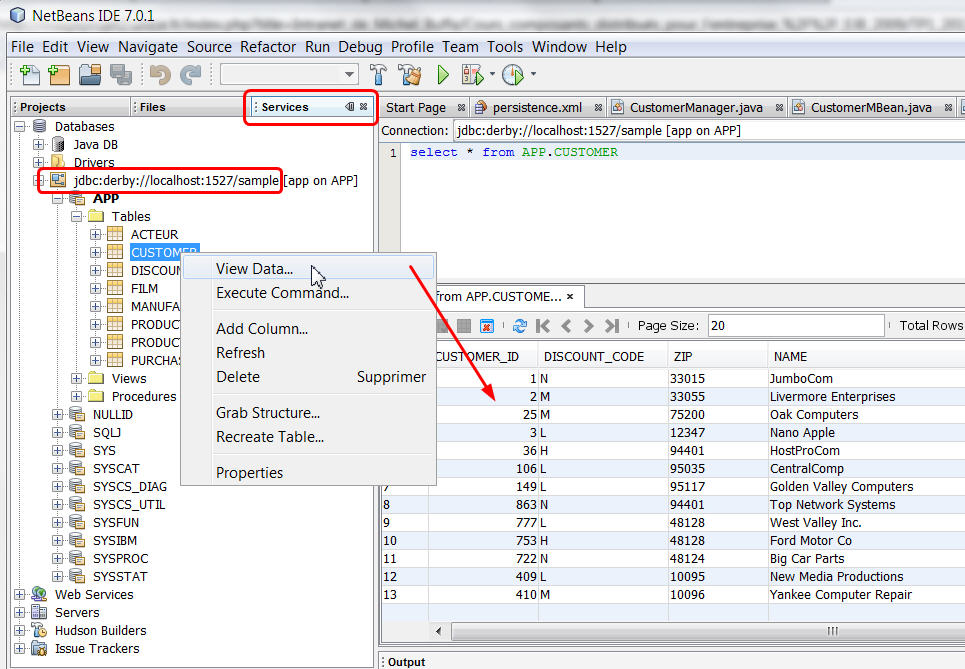
Check: these are the same data you saw in the JSF page !
Now we will modify the display of the discountCode, that is a relation. For the moment the value displayed is "entities.DiscountCode[discountCode=M]" and this is not satisfaying... If you understood the concept of property, you should understand why we modify this line in the JSF page:
- <h:outputText value="#{item.discountCode}"/>
<h:outputText value="#{item.discountCode}"/>
by this one:
- <h:outputText value="#{item.discountCode.discountCode} : #{item.discountCode.rate}%" />
<h:outputText value="#{item.discountCode.discountCode} : #{item.discountCode.rate}%" />
The first property access corresponds to a call to getDiscountCode().getDiscountCode() for the current instance of Customer. The second corresponds to a call to getDiscountCode().getRate() :
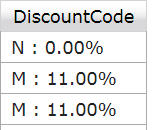
Run the project again, you should get the discount code correctly displayed now.
Ok, stop and try to understand how things articulate in the application.
Replace the datable by a better one from the PrimeFaces library
In the MVC paradigm, views can be more than one, or implemented differently. The model and the controller does not change. JSF allows external component as extensions of the basic JSF set of widgets, or as replacements. The Primefaces library, that wraps a lot of jQuery UI components, proposes a nicer and more powerful databale. Without changing anything to our JSF backing bean, models or facade, we will just replace the current datatable by another one !
Add the primefaces library to the project
See http://www.primefaces.org
This library is bundled with netbeans 7.2, in a recent 3.2 version.
To add it to the project, just right click the web project / properties, Libraries, and click on "add library", then select Primefaces 3.2.
Modify the JSF page to use Primeface's datatable
Add this new namespace for primefaces components:
- xmlnsxmlns:p=xmlns:p="http://primefaces.org/ui"
xmlns:p=xmlns:p="http://primefaces.org/ui"
Then, by prefixing them with "p:" we will be able to use Primefaces components.
- Replace all <h:dataTable> and </h:dataTable> by <p:dataTable> and </p:dataTable>
- same for <h:column> and </h:column>, replace h: by p:
Deploy the project (right click on the blue triangle project / deploy). Run it. You should see:
This table looks better, but if you are curious you will see that you may activate many options by adding attributes or event handlers just look at the demos here: http://www.primefaces.org/showcase-labs/ui/home.jsf
- For exemple, add in the <p:dataTable ...> tag some attributes paginator="true" and rows="10", save, reload the page, wow, the table has pagination icons now... etc.
Display details of a client when we click on a line
Let's see how we can display the details for one customer by clicking on a line in the datatable...
Add a link in a column of the table, to call a method in the JSF bean
Modify CustomerList.xhtml so when we click on a customer Id, we call a method in the JSF bean that will get the current line customer's value and forward to another JSF page with a filled form that displays the customer's details:
- <p:dataTable value="#{customerMBean.customers}" var="item"
- emptyMessage="No customer found with given criteria"
- widgetVar="customerTable"
- paginator="true"
- rows="10">
-
- <f:facet name="header">
- <p:outputPanel>
- <h:outputText value="Search all fields:" />
- <p:inputText id="globalFilter" onkeyup="customerTable.filter()" style="width:150px" />
- </p:outputPanel>
- </f:facet>
-
- <p:column headerText="CustomerId"
- sortBy="#{item.customerId}"
- filterBy="#{item.customerId}"
- filterMatchMode="contains">
- <h:commandLink action="#{customerMBean.showDetails(item)}" value="#{item.customerId}"/>
- </p:column>
- ...
<p:dataTable value="#{customerMBean.customers}" var="item"
             emptyMessage="No customer found with given criteria"
             widgetVar="customerTable"
             paginator="true"
             rows="10">

 <f:facet name="header">
    <p:outputPanel>
        <h:outputText value="Search all fields:" />
        <p:inputText id="globalFilter" onkeyup="customerTable.filter()" style="width:150px" />
    </p:outputPanel>
</f:facet>

<p:column headerText="CustomerId"
          sortBy="#{item.customerId}"
          filterBy="#{item.customerId}"
          filterMatchMode="contains">
    <h:commandLink action="#{customerMBean.showDetails(item)}" value="#{item.customerId}"/>
</p:column>
...
The added line says that when we click on the Id, we call the method showDetails(Customer c) of the JSF managedBean (do not forget: the JSF been is in the HTTP session) :
-
-
-
-
-
- public String showDetails(Customer customer) {
- this.customer = customer;
- return "CustomerDetails";
- }
/**
     * Action handler - called when we click on the id in a line of the datatable
     * @param customer : a Customer object that holds the current line values
     * @return
     */
    public String showDetails(Customer customer) {
        this.customer = customer; // store it in a model
        return "CustomerDetails"; // change JSF page, that will use the model
    }
This method does 2 things
- it store the Customer corresponding to the line clicked into a model named "customer" (this attribute is in the HTTP session, so it will be accessible even if we change from one page to another...),
- it forwards to the CustomerDetails.xhtml JSF page, as we will see, this one will get the values stores in the model in step 1 for pre-filling ther form it contains.
Save and run the project. You will see an hyperlink on the id in the datatable but that links to nothing as the CustomerDetails.xhtml page does not exists yet.
Add a JSF page for displaying a customer's details
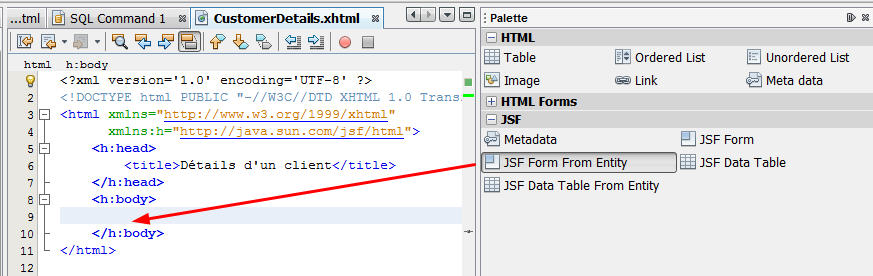
- Add a new JSF page to the web project, name it CustomerDetails.xhtml,
- Drag and drop in the body of this page "jsf form from entity" from the palette tool...
Tell the entity you wan to display in the form, indicate the name of the property in the JSF backing bean :
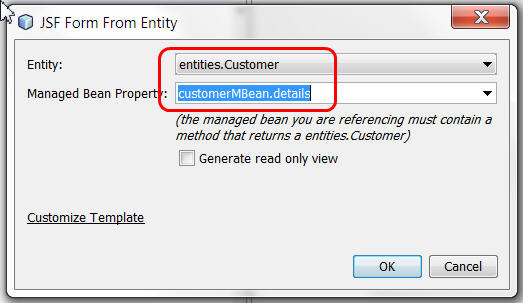
customerMBean.details corresponds to the getDetails() method. Rememer the concept of "property"...
Ok, time to try the project...
Run the project, see that a customer's details are displayed in teh JSF page with the form
Here is what you should get with the client of id=1:
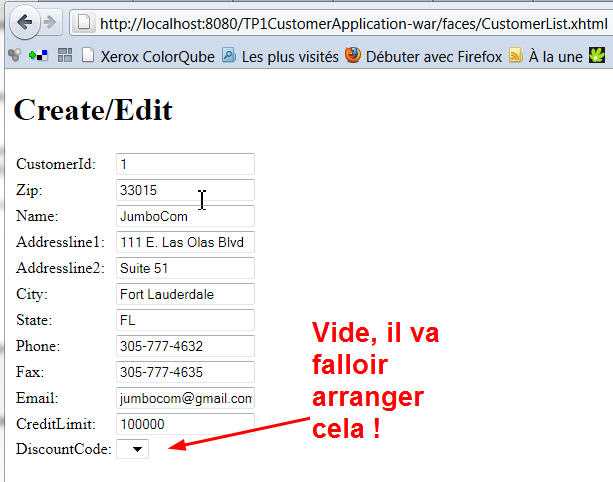
Ok, so we have displayed the details for the Customer with id=1. The DiscountCode for this client is not correct, and we still have to add some buttons for updating or cancelling the update of this client.
Régler l'affichage des DiscountCodes dans le détail d'un client
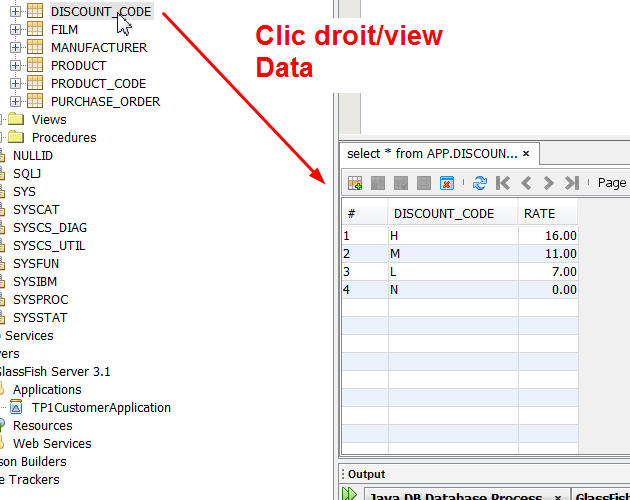
Dans la base de données la table des DISCOUNT_CODE contient juste 4 valeurs correspondants aux quatre types de réductions possibles. Nous allons utiliser un Converter, qui permet de transformer un objet de type entities.DiscountCode en String, et vice versa.
On va commencer par rajouter au projet EJB un session bean stateless dans lequel on ajoutera une méthode List<DiscountCode> getAllDiscountCodes(). Inspirez-vous du gestionnaire de client et de la méthode qui renvoie tous les clients. Plutôt que copier/coller le code ci-dessous, essayez de refaire les étapes que nous avions faites lors de l'écriture du gestionnaire de clients (avec insert code/call enterprise bean, insert code/user Entity Manager etc...)
Vous devriez avoir un code comme ceci :
- package session;
-
- import entities.DiscountCode;
- import java.util.List;
- import javax.ejb.Stateless;
- import javax.ejb.LocalBean;
- import javax.persistence.EntityManager;
- import javax.persistence.PersistenceContext;
- import javax.persistence.Query;
-
- @Stateless
- @LocalBean
- public class DiscountCodeManager {
-
- @PersistenceContext(unitName = "TP1CustomerApplication-ejbPU")
- private EntityManager em;
-
- public List<DiscountCode> getDiscountCodes() {
- Query query = em.createNamedQuery("DiscountCode.findAll");
- return query.getResultList();
- }
-
- public void persist(Object object) {
- em.persist(object);
- }
- }
package session;

import entities.DiscountCode;
import java.util.List;
import javax.ejb.Stateless;
import javax.ejb.LocalBean;
import javax.persistence.EntityManager;
import javax.persistence.PersistenceContext;
import javax.persistence.Query;

@Stateless
@LocalBean
public class DiscountCodeManager {

    @PersistenceContext(unitName = "TP1CustomerApplication-ejbPU")
    private EntityManager em;

    public List<DiscountCode> getDiscountCodes() {
        Query query = em.createNamedQuery("DiscountCode.findAll");
        return query.getResultList();
    }

    public void persist(Object object) {
        em.persist(object);
    }
}
Donc, maintenant on a un EJB qui renvoie toutes les valeurs possibles de DiscountCode.
On va ajouter dans le managed bean du projet web un objet de type javax.faces.convert.Converter, qui nous servira à transformer un objet de type entities.DiscountCode en String, et vice versa. On utilisera une représentation en string de la forme "L : 7.00%", comme dans la colonne du tableau de détail des clients. Pour celà, commencez par indiquer au bean qu'il va appeler un EJB : DiscountCodeManager, celui que nous venons d'écrire. Ensuite, pour utiliser ce converter dans la page JSF .xhtml, on a besoin de définir une méthode get. Voici le code à ajouter dans le managed bean CustomerMBean:
- @EJB
- private DiscountCodeManager discountCodeManager;
-
- public Converter getDiscountCodeConverter() {
- return discountCodeConverter;
- }
-
- private Converter discountCodeConverter = new Converter() {
-
- @Override
- public Object getAsObject(FacesContext context, UIComponent component, String value) {
- return new ConverterException("On verra la conversion String->Objet plus tard...");
- }
- @Override
- public String getAsString(FacesContext context, UIComponent component, Object value) {
- DiscountCode dc = (DiscountCode) value;
- return dc.getDiscountCode()+" : "+dc.getRate()+"%";
- }
- };
@EJB
private DiscountCodeManager discountCodeManager;

public Converter getDiscountCodeConverter() {
    return discountCodeConverter;
}

private Converter discountCodeConverter = new Converter() {

    @Override
    public Object getAsObject(FacesContext context, UIComponent component, String value) {
        return new ConverterException("On verra la conversion String->Objet plus tard...");
    }
    @Override
    public String getAsString(FacesContext context, UIComponent component, Object value) {
        DiscountCode dc = (DiscountCode) value;
        return dc.getDiscountCode()+" : "+dc.getRate()+"%";
    }
};
Finalement, on peut définir une méthode utilitaire qui servira à remplir le menu déroulant de la page JSF CustomerDetails.xhtml. Procédez comme dans le début du TP (insert code/call enterprise bean), puis insérez dans le bean la méthode suivante :
-
-
-
-
-
- public List<SelectItem> getAllDiscountCodes() {
- List<SelectItem> options = new ArrayList<SelectItem>();
- List<DiscountCode> ldc = discountCodeManager.getDiscountCodes();
- for(DiscountCode dc : ldc) {
- options.add(new SelectItem(dc,discountCodeConverter.getAsString(null, null, dc)));
- }
- return options;
- }
/**
 * renvoie un tableau de SelectItem pour affichage dans le menu déroulant
 * de la page des détails d'un client
 * @return
 */
public List<SelectItem> getAllDiscountCodes() {
    List<SelectItem> options = new ArrayList<SelectItem>();
    List<DiscountCode> ldc = discountCodeManager.getDiscountCodes();
    for(DiscountCode dc : ldc) {
        options.add(new SelectItem(dc,discountCodeConverter.getAsString(null, null, dc)));
    }
    return options;
}
Si vous regardez ce code, il se contente de récupérer la liste des DiscountCodes et de la transformer en liste de SelectItems qui est une classe JSF utilisée par le composant <f:selecteditems ... /> qui indique le contenu du menu <h:selectOneMenu.../> situé dans la page CustomerDetail.xhtml. Chaque SelectItem prends en paramètre lors de la construction un objet (l'objet de type DiscountCode) et une string qui le décrit (formatée par le Converter, qui sera visible par l'utilisateur).
On va pouvoir maintenant modifier la partie "menu" de la page CustomerDetails.xhtml afin que la méthode que nous venons d'écrire soit appelée. Voici le code qu'il faut modifier dans CustomerDetails.xhtml :
- <h:selectOneMenu id="discountCode" value="#{customerMBean.details.discountCode}"
- title="DiscountCode" required="true" requiredMessage="The DiscountCode field is required."
- converter="#{customerMBean.discountCodeConverter}">
- <f:selectItems value="#{customerMBean.allDiscountCodes}"/>
- </h:selectOneMenu>
<h:selectOneMenu id="discountCode" value="#{customerMBean.details.discountCode}"
                title="DiscountCode" required="true" requiredMessage="The DiscountCode field is required."
                converter="#{customerMBean.discountCodeConverter}">
	<f:selectItems value="#{customerMBean.allDiscountCodes}"/>
</h:selectOneMenu>
Remarquons plusieurs choses :
- Le contenu du menu est invoqué par value="#{customerMBean.allDiscountCodes}" du tag f:selectItems, cette expression (il s'agit du langage EL de JSF) correspond à un appel à getDiscountCodes() sur le bean de nom customerMBean, c'est la méthode que l'on vient d'écrire.
- L'attribut qui correspond à la propriété du "modèle associé" au menu, c'est à dire la propriété dont la valeur sera affichée dans le menu comme choix par défaut (appel au getter), mais c'est aussi la propriété qui sera modifiée (par un appel à son setter) lorsque la valeur sera modifiée par un nouveau choix dans le menu. Comme les menus renvoient un e String lorsqu'on leur demande la valeur choisie, c'est le Converter qui se charge de transformer un Objet en string et vice-versa. Ici:
- le modèle associé au menu est spécifié par l'attribut value="#{customerMBean.details.discountCode}" du tag h:selectOneMenu (appel de la méthode getDiscountCode() de l'objet renvoyé par la méthode getDetails() du customerMBean
- l'instance de Converter à utiliser est définie par l'attribut converter="#{customerMBean.discountCodeConverter}"du tag h:selectOneMenu (appel de la méthode getDiscountCodeConverter() de du customerMBean.
On peut utiliser le Converter dans la page JSF CustomerList.xhtml également :
- <p:column headerText="DiscountCode"
- sortBy="#{item.discountCode.discountCode}"
- filterBy="#{item.discountCode.rate}%"
- filterMatchMode="contains">
- <h:outputText value="#{item.discountCode}" converter="#{customerMBean.discountCodeConverter}"/>
- </p:column>
<p:column headerText="DiscountCode"
          sortBy="#{item.discountCode.discountCode}"
          filterBy="#{item.discountCode.rate}%"
          filterMatchMode="contains">
    <h:outputText value="#{item.discountCode}" converter="#{customerMBean.discountCodeConverter}"/>
</p:column>
Voilà, sauvegardez, testez, ça doit fonctionner :

Voilà ! Maintenant il ne reste plus qu'à ajouter des boutons de navigation pour mettre à jour les données ou revenir à la liste des clients.
Ajout de boutons pour la mise à jour et retour à la liste
Il suffit de rajouter deux lignes dans le fichier CustomerDetails.xhtml ! Ajoutez ces deux lignes :
- <h:commandButton id="back" value="Back" action="#{customerMBean.list}"/>
- <h:commandButton id="update" value="Update" action="#{customerMBean.update}"/>
<h:commandButton id="back" value="Back" action="#{customerMBean.list}"/>
 <h:commandButton id="update" value="Update" action="#{customerMBean.update}"/>
juste après le menu déroulant pour les discountCodes... Vous comprenez maintenant ce que cela signifie :
- Si on clique sur le premier bouton, on appelle list() dans CustomerMBean.java,
- Si on clique sur le second bouton on appelle update()...
Regardons la version actuelle de la méthode update() :
- public String update() {
- System.out.println("###UPDATE###");
- customer = customerManager.update(customer);
- return "CustomerList";
- }
public String update() {
        System.out.println("###UPDATE###");
        customer = customerManager.update(customer);
        return "CustomerList";
}
Cette méthode prend la propriété "customer", de type Customer et appelle une méthode métier dans le gestionnaire de clients qui va mettre à jour le client en base. Les attributs de cette propriété (nom, etc...) ont pour valeurs celles du formulaire de la page de détails. Si on a modifié ces valeurs avant de cliquer sur le bouton "update", les attributs de la propriété ont été modifiés. Donc on a bien dans "customer" un client mis à jour (en mémoire pour le moment, regardez ce que fait customerManager.update() pour voir. On verra en cours que c'est là que se fait la modification en base de données).
Il existe en effet une relation entre les clients et les codes de remise. Regardez attentivement la classe entité Customer.java, vous verrez que le code de remise est un attribut discountCode de type DiscountCode. Or le menu déroulant dans la page de détails, lorsqu'on modifie le code de remise, nous renvoie une String. C'est le travail du Converter de transformer cette string en objet de type DiscountCode !
Observez la requête nommée DiscountCode.findByDiscountCode définie dans un attribut de la classe bean entité DiscountCode. Cette requète possède un paramètre noté :discountCode. Quand on donne la valeur d'un code de réduction à ce paramètre, on peut récupérer l'objet de type DiscountCode correspondant. On propose d'utiliser une nouvelle méthode public DiscountCode getDiscountCodeByDiscountCode(char code) dans le bean session session.DiscountCodeManager. Voici cette méthode:
- public DiscountCode getDiscountCodeByDiscountCode(char code) {
- Query query = em.createNamedQuery("DiscountCode.findByDiscountCode");
- query.setParameter("discountCode", code);
- return (DiscountCode) query.getSingleResult();
- }
public DiscountCode getDiscountCodeByDiscountCode(char code) {
        Query query = em.createNamedQuery("DiscountCode.findByDiscountCode");
        query.setParameter("discountCode", code);
        return (DiscountCode) query.getSingleResult();
 }
Observez: on associe le caractère code au paramètre de requête "discountCode", et on récupère un unique résultat de type DiscountCode: query.getSingleResult().
Voici finalement ce qu'on vous propose comme transformation String->DiscountCode par le Converter:
- private Converter discountCodeConverter = new Converter() {
-
- @Override
- public Object getAsObject(FacesContext context, UIComponent component, String value) {
- char code = value.charAt(0);
- DiscountCode dc = discountCodeManager.getDiscountCodeByDiscountCode(code);
- return dc;
- }
- @Override
- public String getAsString(FacesContext context, UIComponent component, Object value) {
- DiscountCode dc = (DiscountCode) value;
- return dc.getDiscountCode()+" : "+dc.getRate()+"%";
- }
- };
private Converter discountCodeConverter = new Converter() {

        @Override
        public Object getAsObject(FacesContext context, UIComponent component, String value) {
            char code = value.charAt(0);
            DiscountCode dc = discountCodeManager.getDiscountCodeByDiscountCode(code);
            return dc;
       }
        @Override
        public String getAsString(FacesContext context, UIComponent component, Object value) {
            DiscountCode dc = (DiscountCode) value;
            return dc.getDiscountCode()+" : "+dc.getRate()+"%";
        }
    };
Exécutez, testez, amusez-vous à modifier les valeurs des clients, vérifiez dans le gestionnaire de base de données de netbeans que les modifications ont été prises en compte...
Problèmes devant encore être réglés :
- Si on ouvre deux listes dans deux onglets différents, et qu'on modifie deux clients en même temps, que peut-il arriver ? Pourquoi ?
- Les URLs ont tous un temps de retard, la page de détails affiche l'URL de la liste, etc. Pourquoi ? Nous verrons en cours comment corriger ce problème.
- Ajoutez une trace dans la méthode getCustomers() de CustomerMBean.java, affichez la liste des clients, la méthode est appelée plusieurs fois. Proposez une optimisation. Attention, cela peut provoquer d'autres problèmes...
Nous verrons comment corriger ces problèmes dans un autre TP.
Pour la semaine prochaine:
Inspirez-vous de l'article d'introduction à JSF 2.0 du site de Netbeans http://netbeans.org/kb/docs/web/jsf20-intro.html (Cet article contient plein de trucs pour développer plus rapidement et plus efficacement sur NetBeans !!!) pour utiliser une facelet pour rendre le site ergonomique (un en-tête avec le titre du TP (statique) et le titre de chaque page mis en forme, et une colonne de gauche qu'on utilisera plus-tard pour mettre les liens de navigation).