|
|
Page modifiée à 12:01, 5 Déc 2012 par MichelBuffa
Design Patterns Java EE 6De $1Table des matières
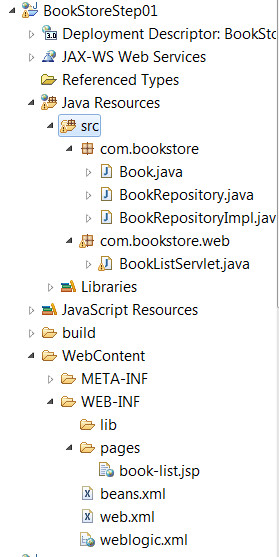
Software installationYou will use both Eclipse/Weblogic/MySQL and netbeans 7.2/glassfish/JavaDB for these exercises. Why two different environments ? Because developement with JSF 2 is a lot easier with netbeans and we do not have much time... So, some examples will be run using Eclipse, some other using netbeans... Install Weblogic + Oracle enterprise pack for eclipseInstall the file named oepe-indigo-installer-12.1.1.0.1.201203120349-12.1.1-win32.exe get all the default options. We assume that there is a JDK installed on your system. Once the installation is finished, look at your windows start menu and run "Oracle Enterprise Pack For Eclipse/Weblogic server 12c/Tools/configuration wizard" and create a default domain, using the default options. The instructor will show on the video projector what to set. When prompted for an admin password, try to enter one you will remember !!!! Normally, if everything went fine, you should see a new menu in your start menu: "Oracle Enterprise Pack for Eclipse/user projects/base domain"... from this menu you can start the admin server, then when the admin server has been started (in a dos window you should see the message "server started in RUNNING mode"...), you can use the menu to open the admin console. If there is an error there, something went wrong, call your instructor... Install MySQLThere are many version of MySQL installers available. We provide a zip that do not need any install at all. Just unzip the file mysql-noinstall-5.1.35-win32.zip in c:\mysql for example. In order to run the MySQL server, open a DOS window, go to c:\mysql\bin\ and run "mysqld.exe", this will start the MySQL daemon. Open another DOS window, go to the same directory and run "mysql.exe -u root", the admin tool. Enter "show databases;" to see all the databases available. This should display a table with some prefefined databases. The Bookstore example : shows JSP / Servlet model 2 approach (MVC)This tutorial is available on the web at : http://wiki4.caucho.com/Java_EE_Tuto...d_Servlets_3.0 but we will just use it with WebLogic instead of with the Resin server. Step 01 : a model, a facade/DAO, a controller Servlet, a JSP for a table viewYou follow the tutorial for the first step : http://wiki4.caucho.com/Building_a_s...listing_in_JSP but when in the tutorial they ask to select Resin as a new runtime environment, just select Weblogic in the list. The rest of the tutorial is ok... Or you can just open the Eclipse project provided named "BookStoreStep01", that corresponds to this part of the tutorial. If you follow the tutorial, you will get a project like this: With :
In order to run and deploy this project, use the Java EE perspective, go to the "server tab", right click on "oracle weblogic..." and chose "add and remove". Then select your project BookStoreStep01 and Ok. This will deploy your project on weblogic. Then use "run on server" on your project. This should display a list of books in the JSP page. Look at how the code is organized, how we go from the Servlet to the JSP etc. This examples uses CDI for injecting the Facade into the Servlet using CDI, like explained in the course. Step 02 : adding the CRUD operations...This is the tutorial part 2: http://wiki4.caucho.com/Java_EE_Serv...kstore_listing It is also available in the BookStoreStep02 Eclipse project. In this step, a new Servlet has been added for handling update/insert new book operations, as well as a new JSP that will display a form that will be use for both editing an existing book or creating a new book. The business part is already implemented in the facade, we are just dealing with HTTP control and view here. The link with the table view is just a <a href> added in the table. Step 03: just adding come CSS, headers and footers...This step is not very relevant to our design pattern course, you may check it at : http://wiki4.caucho.com/Java_EE_Serv..._for_bookstore it corresponds to the BookStoreStep03 Eclipse project. Step 04: Add a second implementation for the facade, that uses JDBC, use injection with qualifiersThis example corresponds to this tutorial: http://wiki4.caucho.com/Java_EE_Serv...kstore_example BEWARE : all the MySQL, database creation part must NOT be followed in this tutorial, we will proceed a bit differently. This step corresponds to the BookStoreStep04 Eclipse project. Create a Bookstore MySQL database, add a table named "book" insideIn order to run this project, you will need to create a database named "Bookstore" in the MySQL server you installed today. Do not follow what is indicated in the online tutorial, instead follow these steps:
Then in Eclipse, you can add the database we just created to the "Datasource Explorer" tab of the Java EE perspective. Add the connection to the DB admin tool in Eclipse java EE perspective
Add this new Database as a DataSource in WeblogicWe need to add this database in Weblogic + give it a JNDI name so that we can access it from our program. The JNDI name used in the tutorial is "jdbc/bookstore", so we will use that in WebLogic.
In WebLogic 12c, run the admin server from the windows start menu, then open the weblogic admin console (also from start menu).
Yepo ! We finished with the Database setting part of this exercise, let's do more interesting things now ! Either do the tutorial, starting at the Create Repository class that Implements BookRepository using JDBC section, or look at the BookStoreStep04 eclipse project.Notice that in that project, we are going to provide a second implementation of the façade that uses JDBC and the Bookstore database we created. We will use injection for getting a reference to the facade object and we will use CDI qualifiers (that are user friendly labels) in order to inject the implementation we prefer. A Simple JSF2 login/password exampleFor this example, we will use netbeans and glassfish. So please, shut down Eclipse, Weblogic and MySQL. Run netbeans. We will just look at a very simple project that uses JSF2 for handling a login/password session. This example is interesting as it shows :
Open with netbeans the project named : JSFLoginPassword.zip, unzip it somewhere (Documents\Netbeans projects is the standard directory...), and run it. It's the exact example illustrated during the course. We will comment it live. |
Powered by MindTouch Deki Open Source Edition v.8.08 |